products-tutorial

#All
Lightburn WiFi Bridge - Longer Nano

Longer Nano & Nano Pro adopt a powerful MKS DLC32 mainboard, characterized by USB connectivity, wireless technology, accessories connection interface, and total interaction with your smartphone through the Longe LaserBurn application.


The most common method of using Longer Nano is to connect the machine to your Laptop via a TypeC - USB connection, or by exporting a gcode file to be run via the Longer LaserBurn application. However, there is also an intermediate mode of operation, based on WiFi connectivity, which allows you to use Lightburn and Longer Nano without a USB cable.


Connecting the Laptop and Longer Nano with a TypeC - USB cable requires them to be within a short distance of each other, as the maximum extension of a USB cable is about 3 meters only. On the other hand, connecting the Laptop with Lightburn and Longer Nano wirelessly allows you to position yourself at a greater distance, so as to obtain good greater security during the engraving process. For this reason, using Lightburn in WiFi mode offers numerous advantages in terms of security and efficiency, thus expanding the user's comfort and versatility of Longer Nano

In order to connect Longer Nano and Lightburn wirelessly, you first need to complete the WiFi setup process on your Longer Nano. To do this, proceed as follows. 


1.Power on Longer Nano and wait some seconds


2.On your laptop, search for Wi-Fi network named 'LongerNano_' and connect to it. The Wi-Fi password is: 12345678

Once the Longer Nano has been successfully connected to the Laptop via WiFi, proceed to open Lightburn on your Laptop. At this point, proceed as follows. 
1.Connect your Laptop to the Longer Nano Wi-Fi network previously set

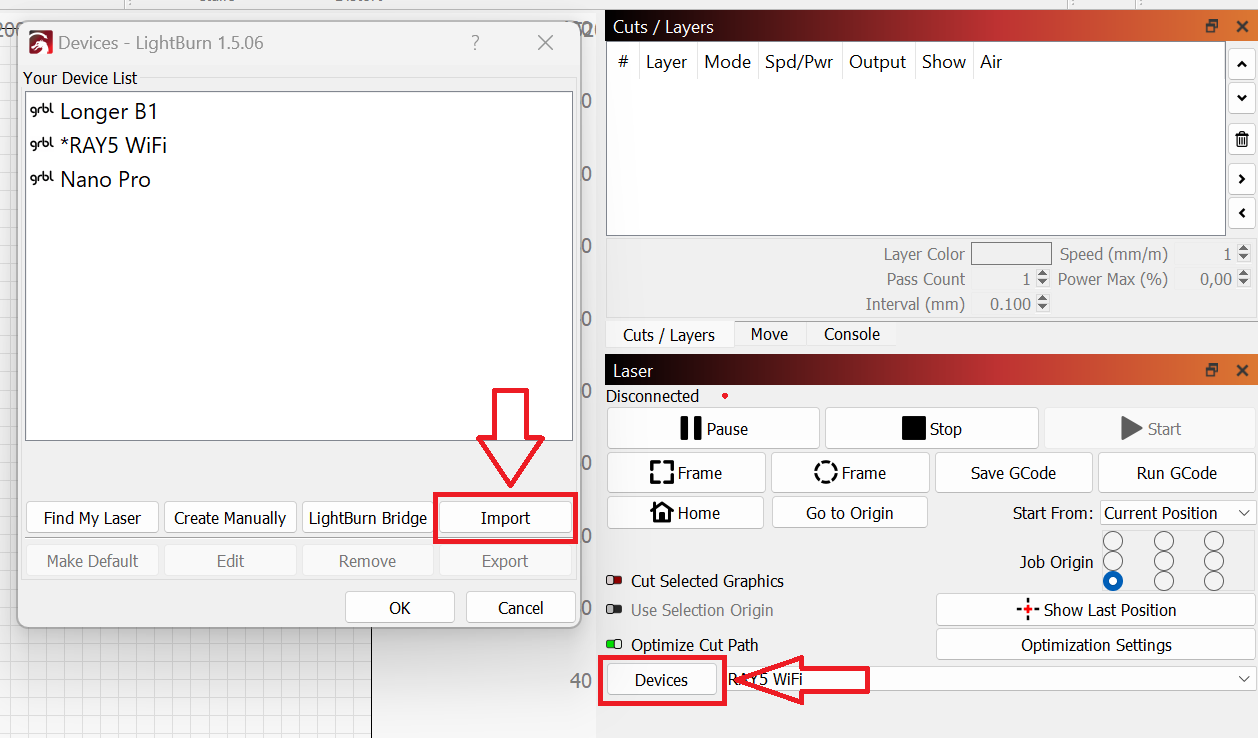
2.Click on "Devices", then click on "Import" to add a new device

3.Select the Nano.lbdev file included inside the Longer Nano microSD card, and confirm the import

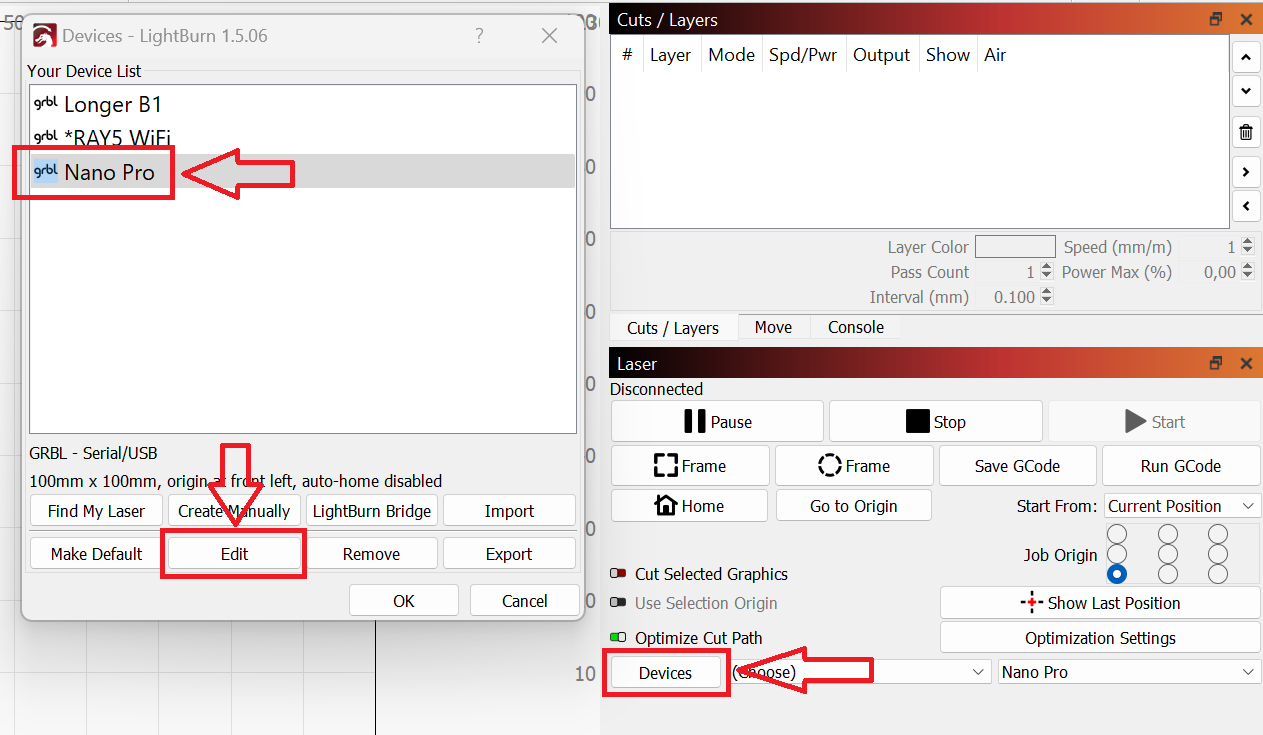
4.Once done, click again on "Devices", then select Longer Nano from the list, and then click on "Edit" 

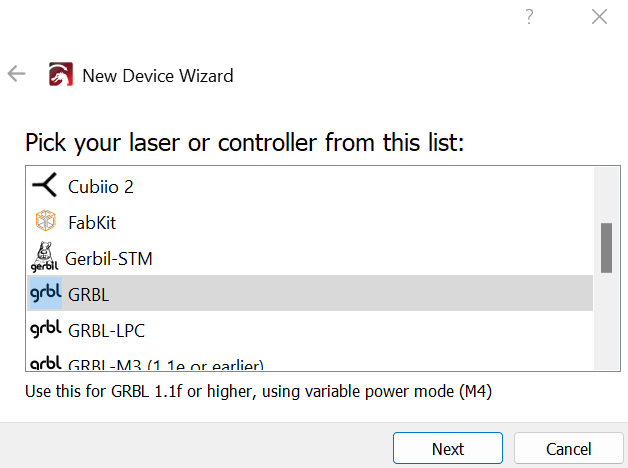
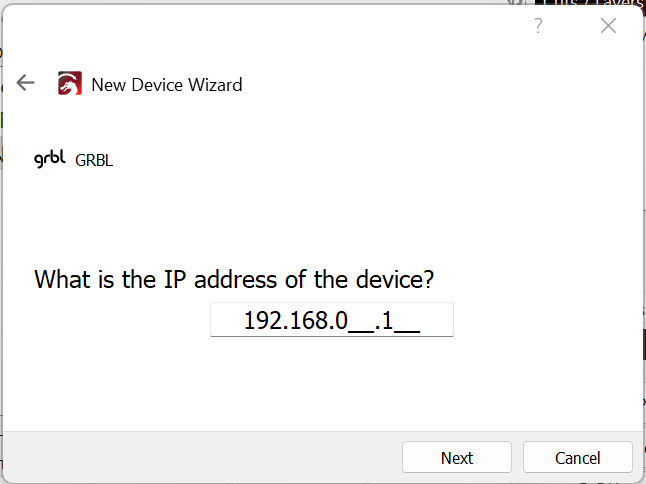
5.Select GRBL and press "Next" button

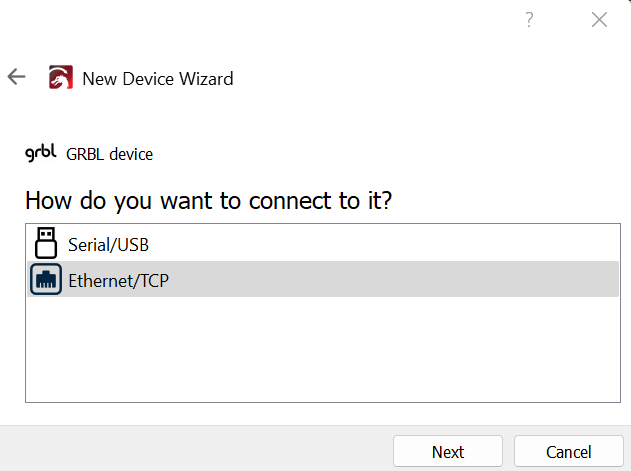
6.Select Ethernet/TCP and press "Next" button

7.Enter the IP address of the Longer Nano (192.168.0.1)

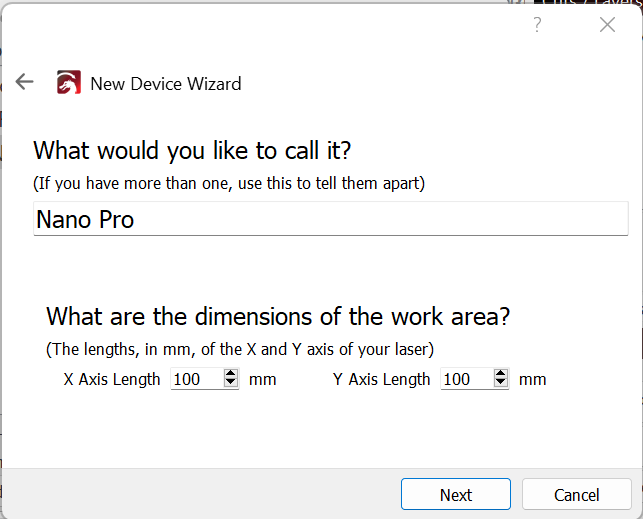
8.Enter the following data - Name: NANO Pro / X = 100 / Y = 100

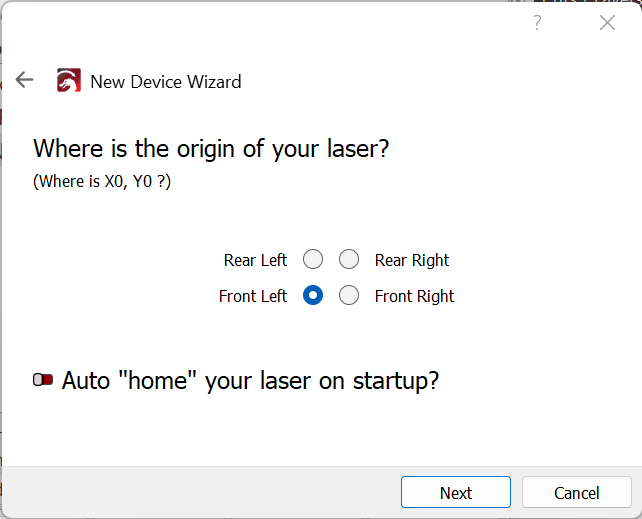
9.Select "Front Left" as your Origin and deactivate "Auto Home", then click "Next" button

10.In the next window, press "Finish" to complete the setup

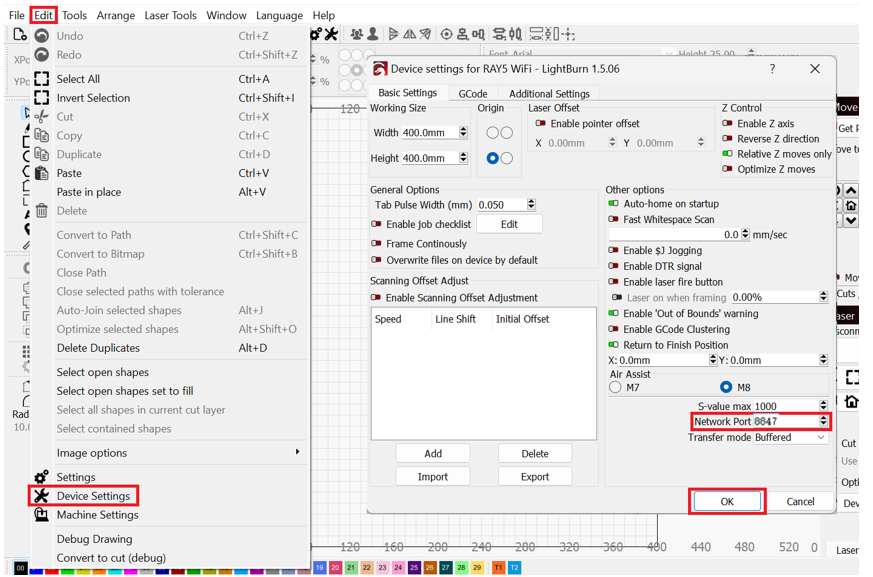
11.After successfully creating "NANO WiFi" you need to set up the correct Network Port. On the main screen, press "Edit" and then "Device Settings", then set "Network Port 8847" and confirm with "OK"

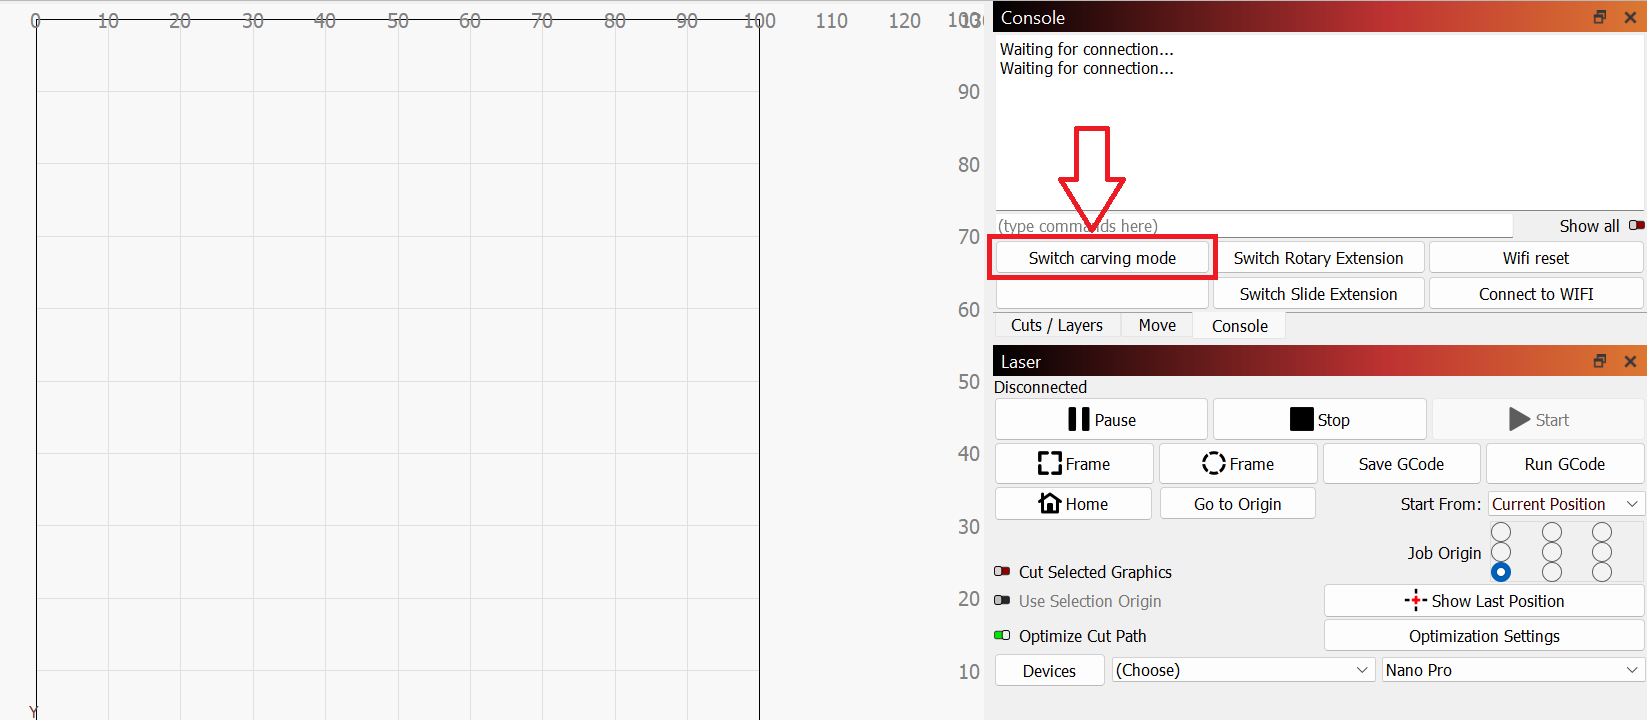
12.At this point, your NANO is ready to be used in LightBurn software in WiFi mode. Close Lightburn and restart it, and if everything has been done correctly, the connection status will change from "Disconnected" to "Ready", and it will be possible set the Carving Mode

Please note that in order for the WiFi Bridge to work properly, both the Laptop and the Longer Nano must be connected to the same WiFi and in close distance.


By products-tutorial | September 2, 2024
LONGER Test: Cutting images with LaserGRBL and Longer Laser B1 & Ray5

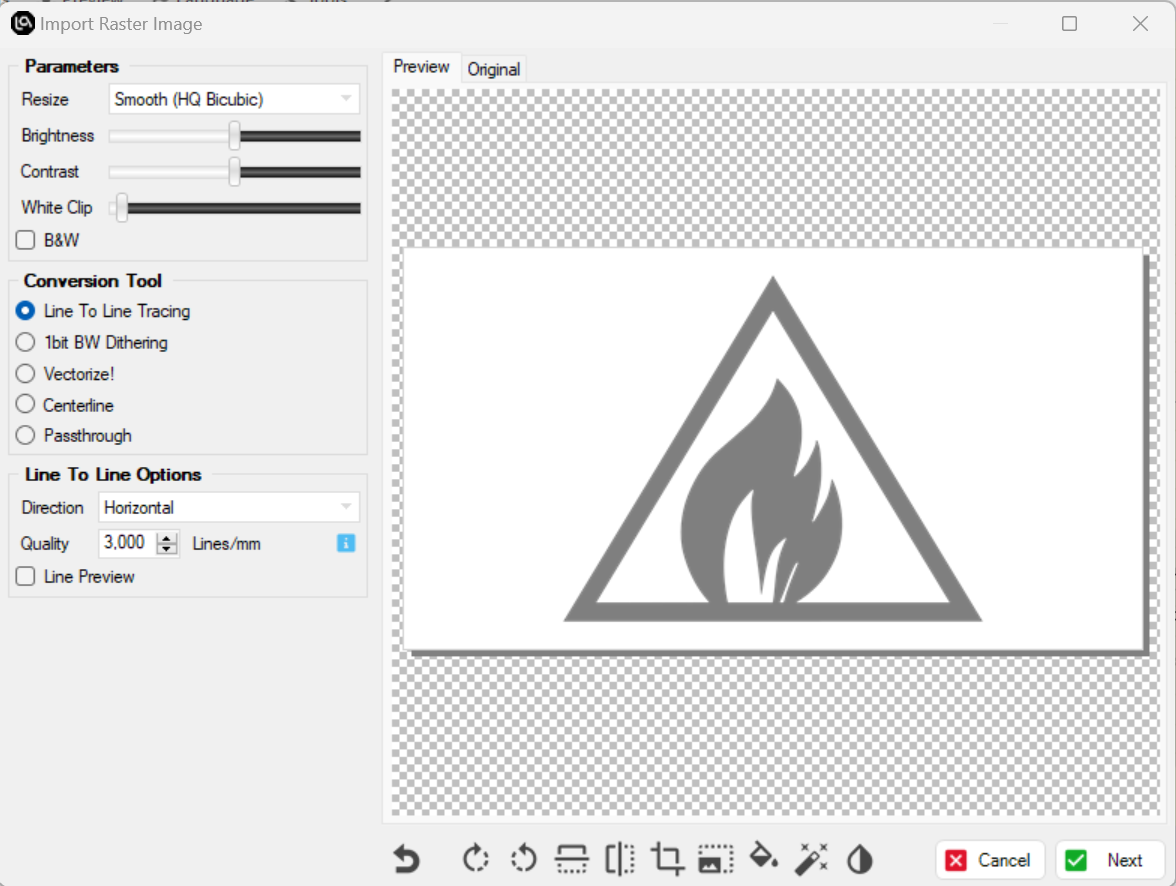
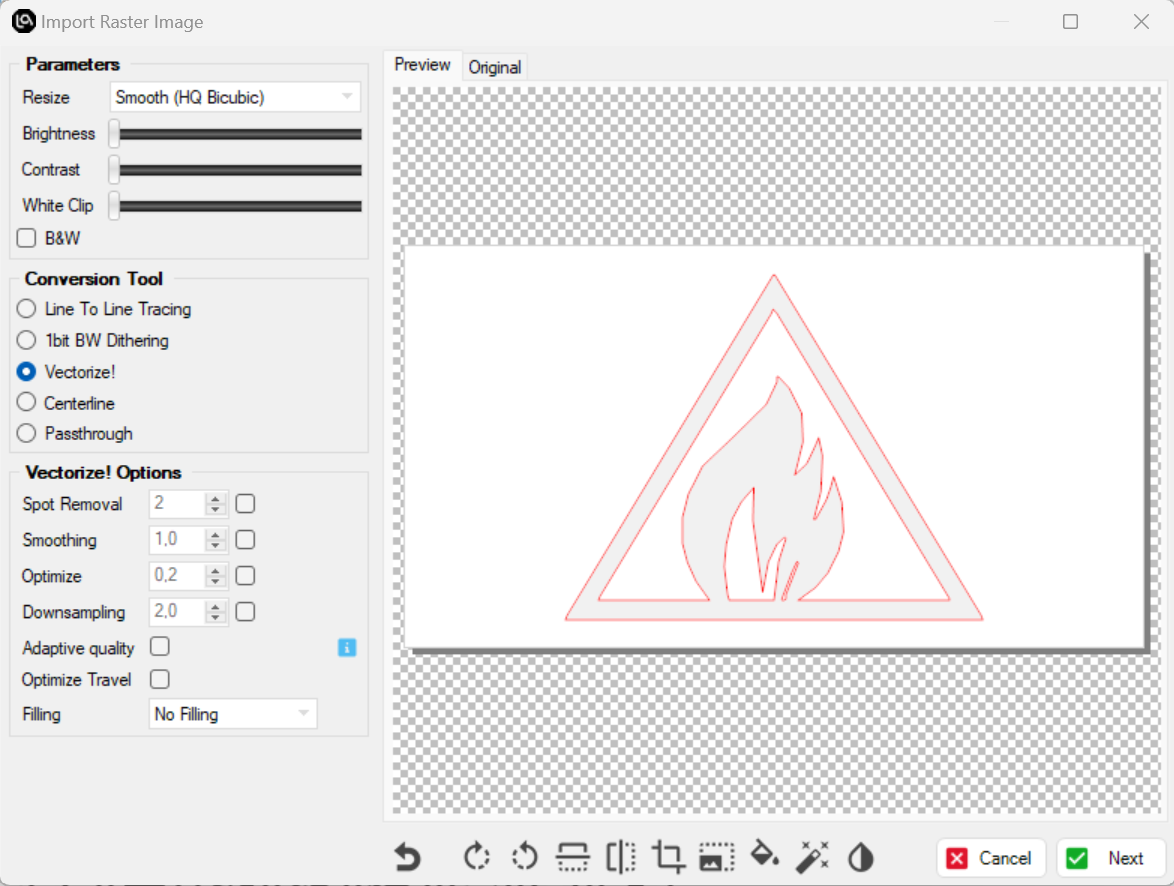
Longer Laser B1 and Longer Ray5 are laser engravers capable of engraving and cutting multiple types of materials. In particular, many users of Longer Laser B1 and Ray5 prefer to carry out engraving and cutting using Lightburn, however others prefer to use LaserGRBL as it is free software. In particular, LaserGRBL is a software more optimized for laser engraving, with a good processing capacity of the images to be engraved, however, although with some limitations, it also allows you to convert image files into ".svg" vector files, so that you can make laser cuts starting from a graphic image. 

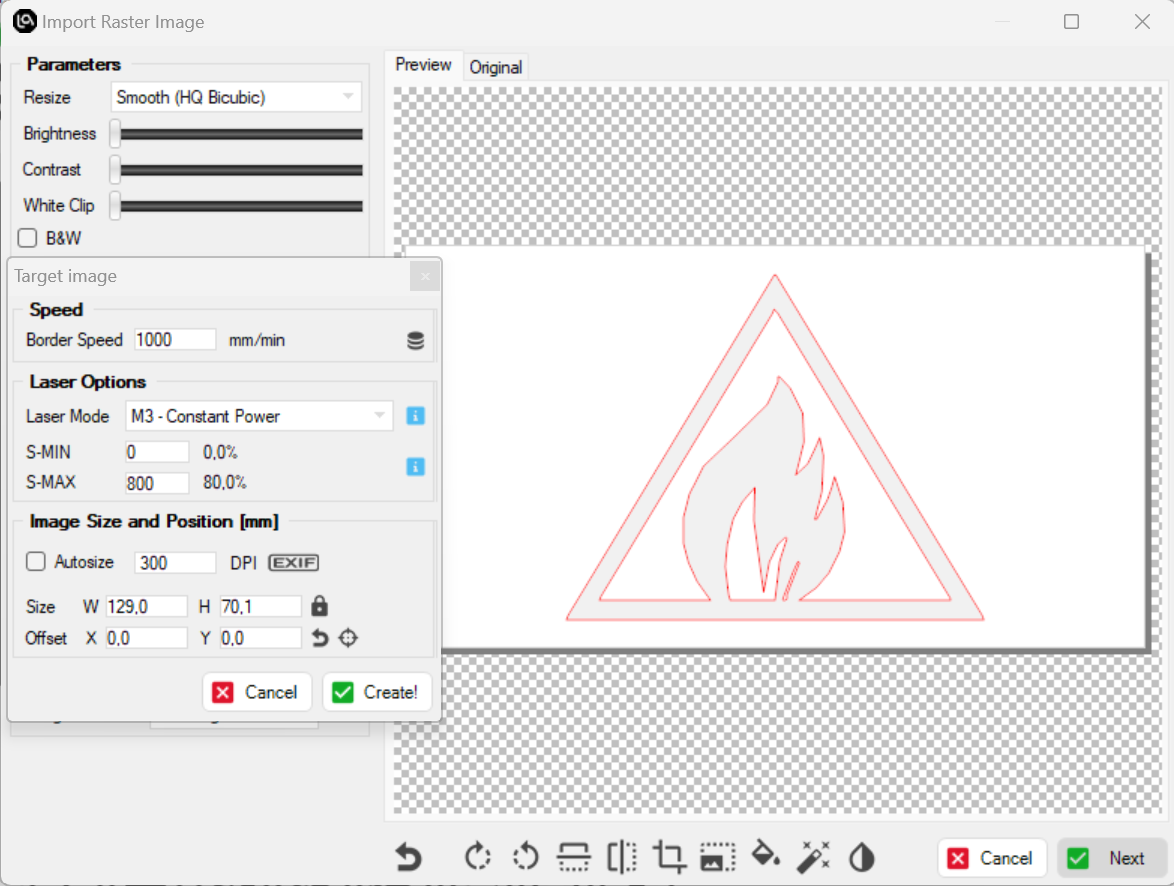
After opening an image in LaserGRBL, proceed to set the engraving parameters in the window on the center of the screen. 

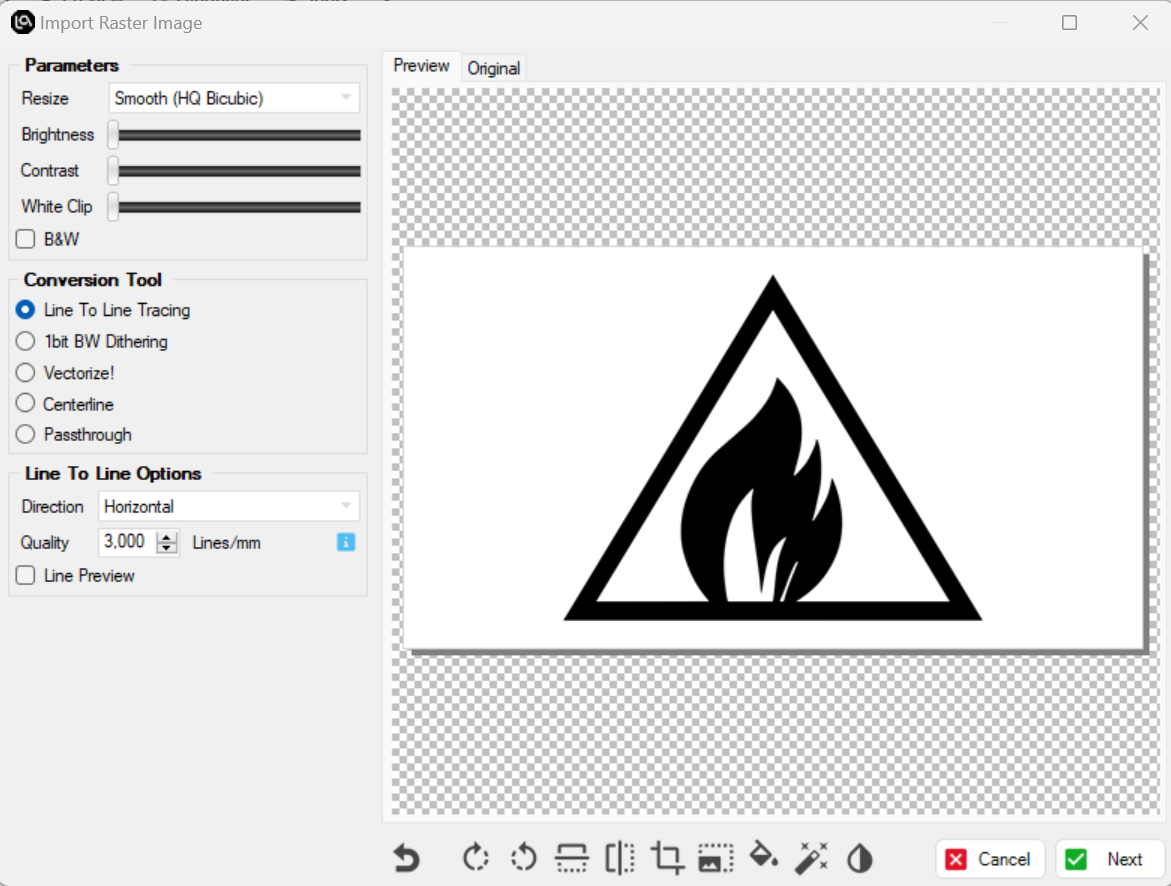
In detail, change the Brightness and Contrast parameters, so that the image takes on a color tone tending to black.

After setting the engraving parameters, click with mouse on "Vectorize!", then eventually adjust Brightness and Contrast if necessary. Once done, click "Next".

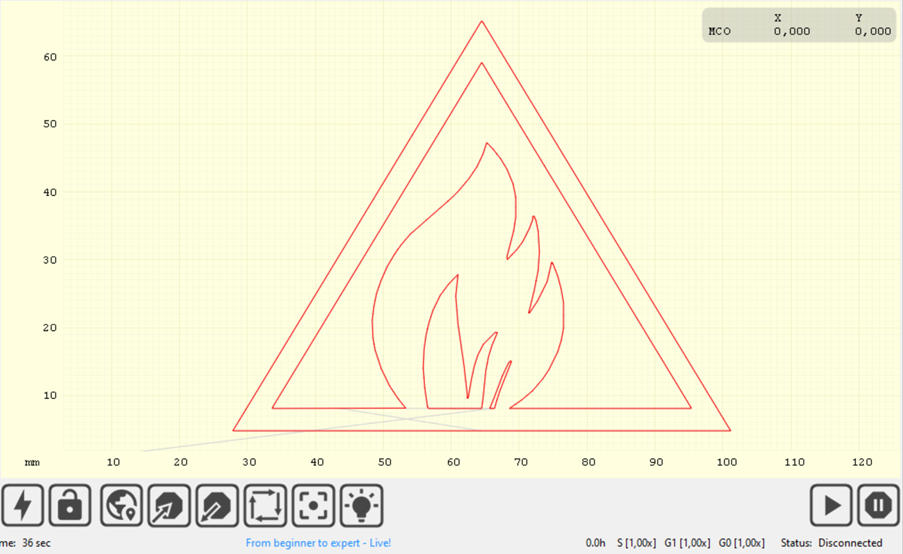
In the screen that opens, define the cutting parameters, such as speed, power, and size. Once done, click "Create!". Remember that, depending on the speed and power set, an engraving or a cut will be made, always based on the same vector file.

At this point, the file will be ready to run. Save Gcode to export the working file to the microSD of Longer Laser B1 and Ray5, then proceed to start working on Longer Laser B1 and Ray5. Alternatively, you can connect Longer Laser B1 and Ray5 via USB cable to LaserGRBL to do the job directly.

In this way, Longer Ray5 will cut or engrave the selected image, following the vectorial perimeter set above. 


By products-tutorial | July 4, 2024
LONGER Research: Exploring Laser B1 20W Laser Engraving for Smartphone Customization

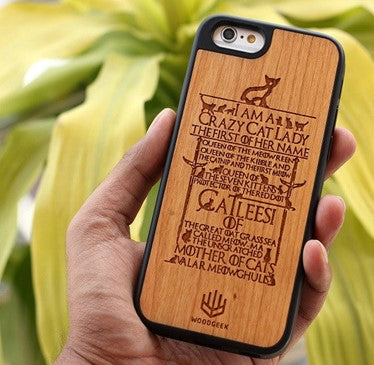
Using a laser engraver like the Laser B1 20W, individuals can achieve designs that are not only aesthetically pleasing but also durable and unique. Unlike traditional methods, laser engraving allows for the precise etching of personalized names, initials, inspirational quotes, and elaborate artwork directly onto smartphone cases. This capability transforms ordinary phone covers into personalized pieces of art, reflecting individual tastes and preferences.

Advances in laser engraving phone cases


The advantages of owning a laser engraving machine for such applications are significant. Firstly, the level of customization achievable with a Laser B1 20W surpasses that of manual methods, ensuring consistent quality and precision. Whether engraving intricate patterns, custom portraits, or abstract designs, the laser's high-speed capability of up to 36000mm/min ensures efficient production without compromising on detail.


Moreover, the durability of laser-engraved designs is notable. The engraved marks on smartphone cases resist fading and wear over time, maintaining their clarity and aesthetic appeal longer than traditional surface applications. This durability is enhanced by the machine's robust construction and long laser head life of over 10000 hours, ensuring reliability and minimal maintenance.


In contrast, traditional methods such as manual painting or printing lack the permanence and precision offered by laser engraving. Hand-painted designs may fade or chip, while printed graphics can peel off with use. Laser engraving, however, embeds designs into the material itself, ensuring longevity and resistance to external elements.


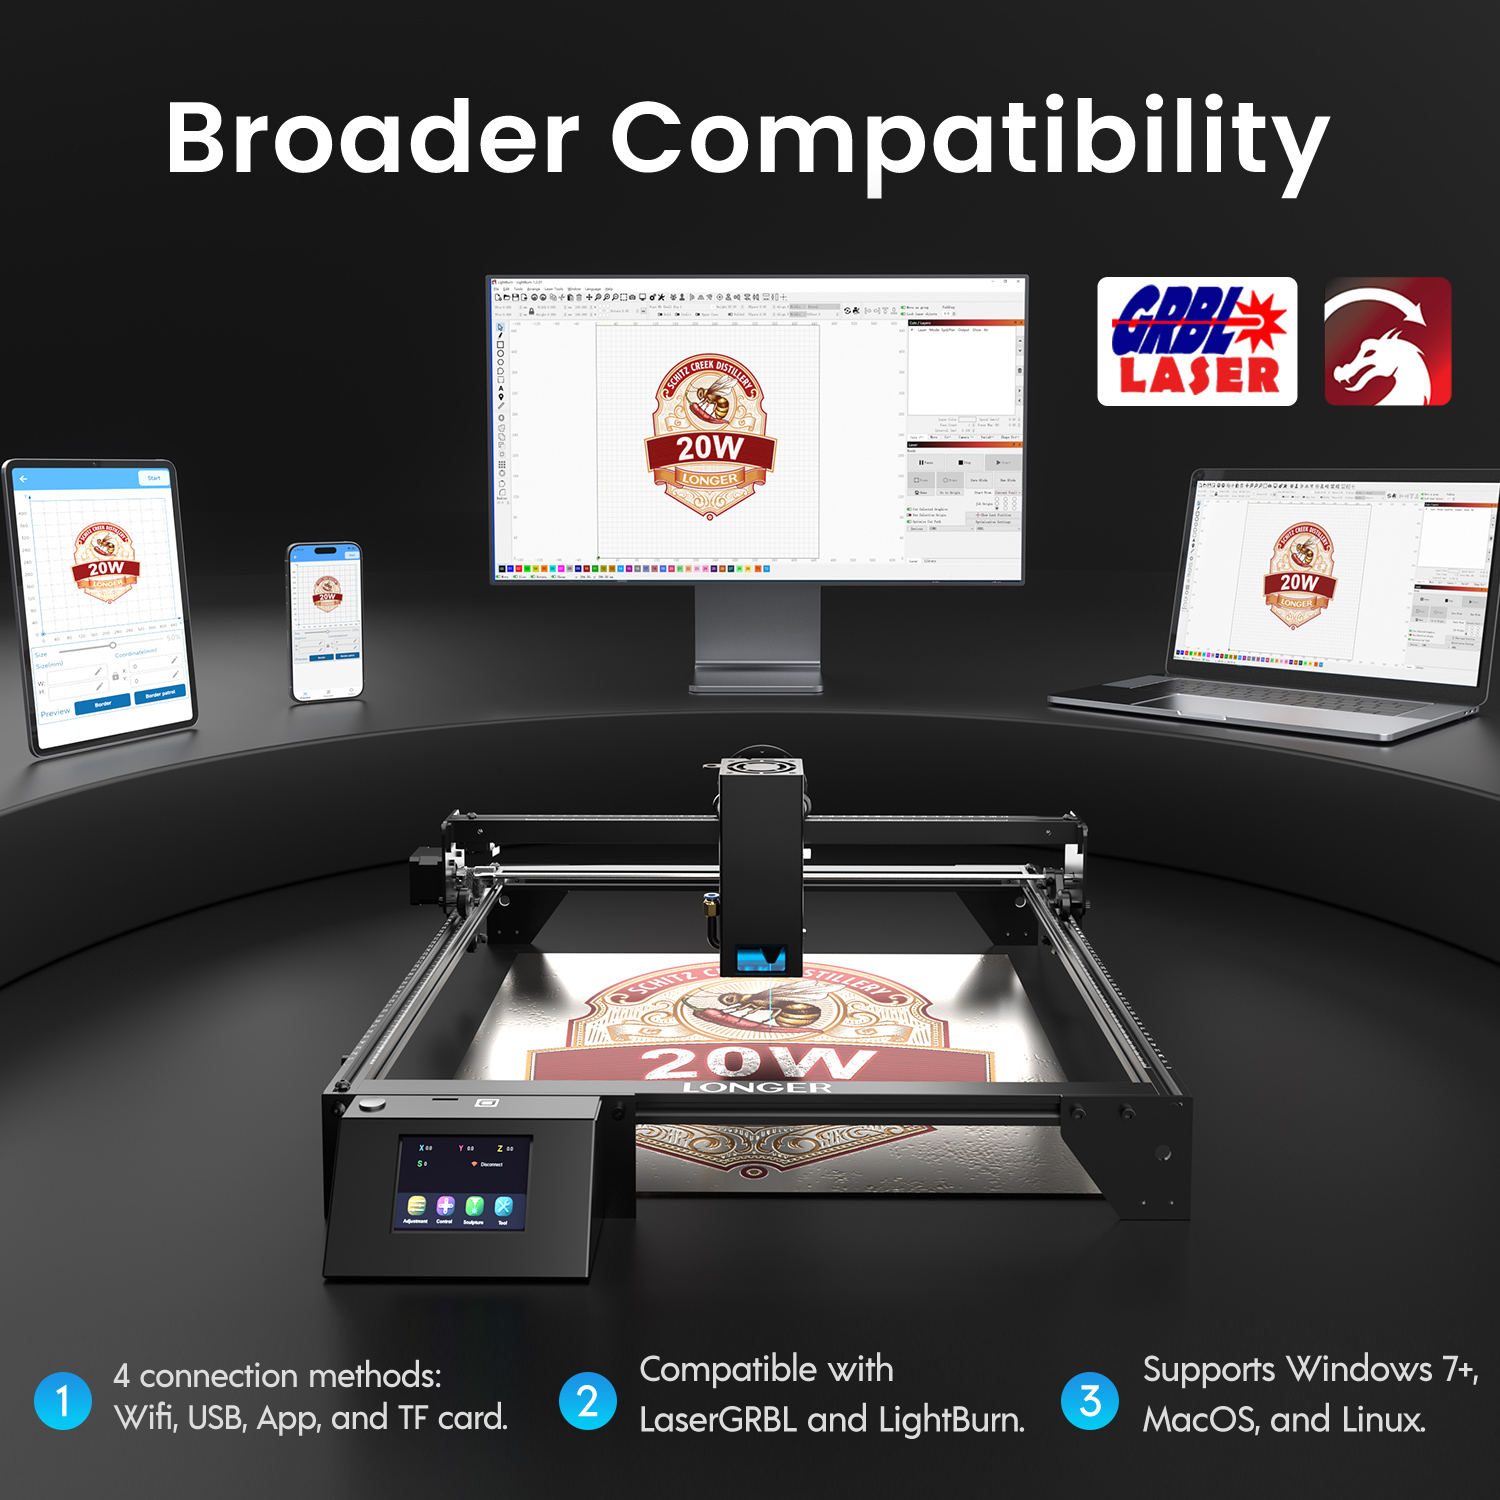
Furthermore, the flexibility of the Laser B1 20W extends to its compatibility with various image formats (JPG, PNG, BMP, GIF, SVG, AI, etc.) and operating systems (LaserGRBL for Windows, LightBurn for Windows, macOS, Linux, and LaserBurn APP for Android, iOS). This compatibility allows users to seamlessly integrate their design workflow from image creation to engraving, enhancing convenience and productivity.


In conclusion, the integration of laser engraving technology into smartphone customization represents a paradigm shift in personalization and craftsmanship. The capabilities of machines like LONGER's Laser B1 20W empower users to transform everyday objects into personalized artifacts, blending technology with individual expression in unprecedented ways. As this technology continues to evolve, its potential applications in personalization and manufacturing are poised to expand, offering endless possibilities for creativity and innovation.

Popular Phone Case Design Ideas:


1. Personalized Names, Initials, Inspirational Quotes or Messages: Engrave your name or initials on the smartphone case for easy identification and a personal touch. Laser-engrave motivational quotes or messages that inspire, adding a meaningful touch to your everyday device.


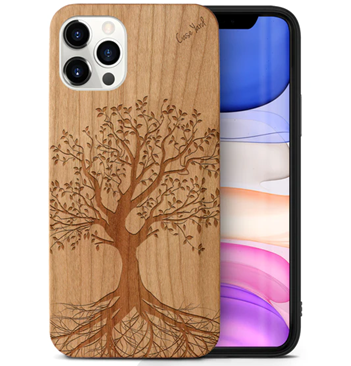
2. Artwork or Illustrations: Incorporate artistic designs or upload custom artwork to create a unique aesthetic on your smartphone case. Engrave natural motifs like flowers, leaves, or animals to bring a touch of the outdoors to your smartphone.


3. Custom Portraits: Create personalized silhouettes of loved ones, pets, or celebrities to make your smartphone case truly one-of-a-kind. Showcase your fandom with logos, quotes, or symbols from your favorite TV shows, movies, or bands.

Conclusion

These Laser B1 20W design options cater to a wide range of preferences and styles, offering flexibility for creating a case that reflects individual tastes. As laser engraving technology continues to evolve, users are encouraged to explore combinations of these ideas or develop their own unique designs to personalize their smartphone cases effectively.


By products-tutorial | June 26, 2024
Lightburn WiFi Bridge - Longer B1

Longer B1 adopts an MKS mainboard, characterized by USB connectivity, wireless technology, microSD card reading, touchscreen display with graphic interface (optional) and total interaction with your smartphone through the MKSLaser application or Longer LaserBurn. 

The most common method of using Longer B1 is to connect the machine to your Laptop via a USB connection, or by exporting a gcode file to be run via the Longer B1 microSD. However, there is also an intermediate mode of operation, based on WiFi connectivity, which allows you to use Lightburn and Longer B1 without a USB cable. 

Connecting the Laptop and Longer B1 with a USB cable requires them to be within a short distance of each other, as the maximum extension of a USB cable is about 3 - 5 meters. On the other hand, connecting the Laptop with Lightburn and Longer B1 wirelessly allows you to position yourself at a greater distance, so as to obtain good greater security during the engraving process. For this reason, using Lightburn in WiFi mode offers numerous advantages in terms of security and efficiency, thus expanding the user's comfort and versatility of Longer B1

NOTE: This procedure works only with Longer B1 (without TouchScreen), if you installed TouchScreen and its specific firmware this procedure cannot work.

In order to connect Longer B1 and Lightburn wirelessly, you first need to complete the WiFi setup process on your Longer B1. To do this, proceed as follows. 

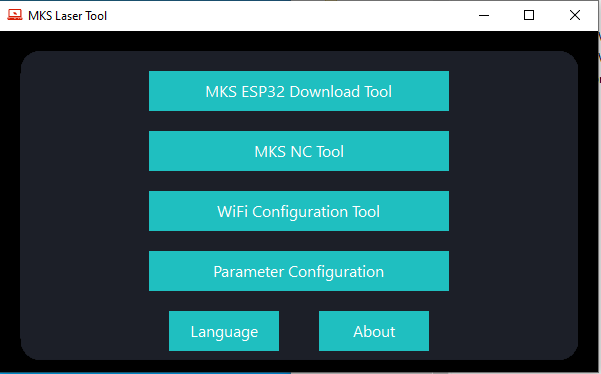
2.Once installed successfully, run the software as administrator. Then, choose “WiFi Configuration Tool”
 

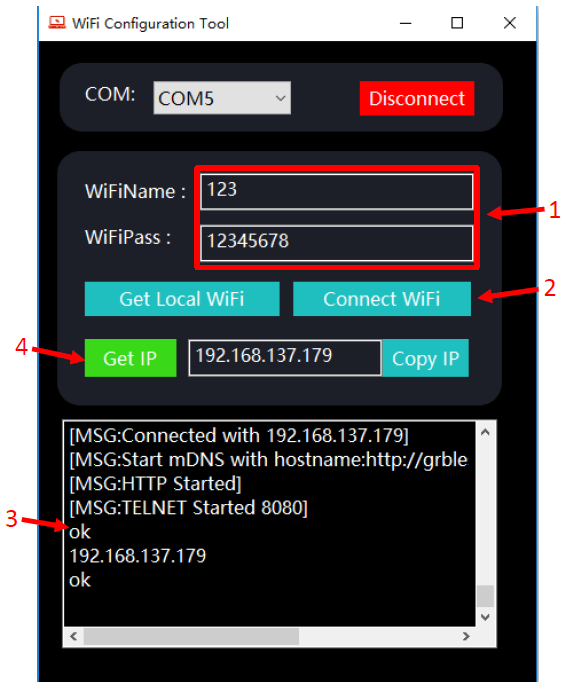
3.In the next window, select the right COM port, add the name & password for own router and wait for the connection success. Once it’s done, Get IP and note it for future usage

NOTE: The IP address of Longer B1 may change frequently, so it is recommended that you set an IP RESERVATION for the Mac-Address of B1 within the DHCP parameters of your Router/AccessPoint, so that you always get the same IP address at each subsequent connection. Otherwise, it could be necessary to repeat the procedure above each time to get always the new casual IP address.

Once the Longer B1 has been successfully connected to the WiFi Router/AccessPoint and the IP address has been successfully provided and noted, proceed to open Lightburn on your Laptop. At this point, proceed as follows. 

1.Connect your Laptop to the same WiFi Router/AccessPoint to which you have connected Longer B1

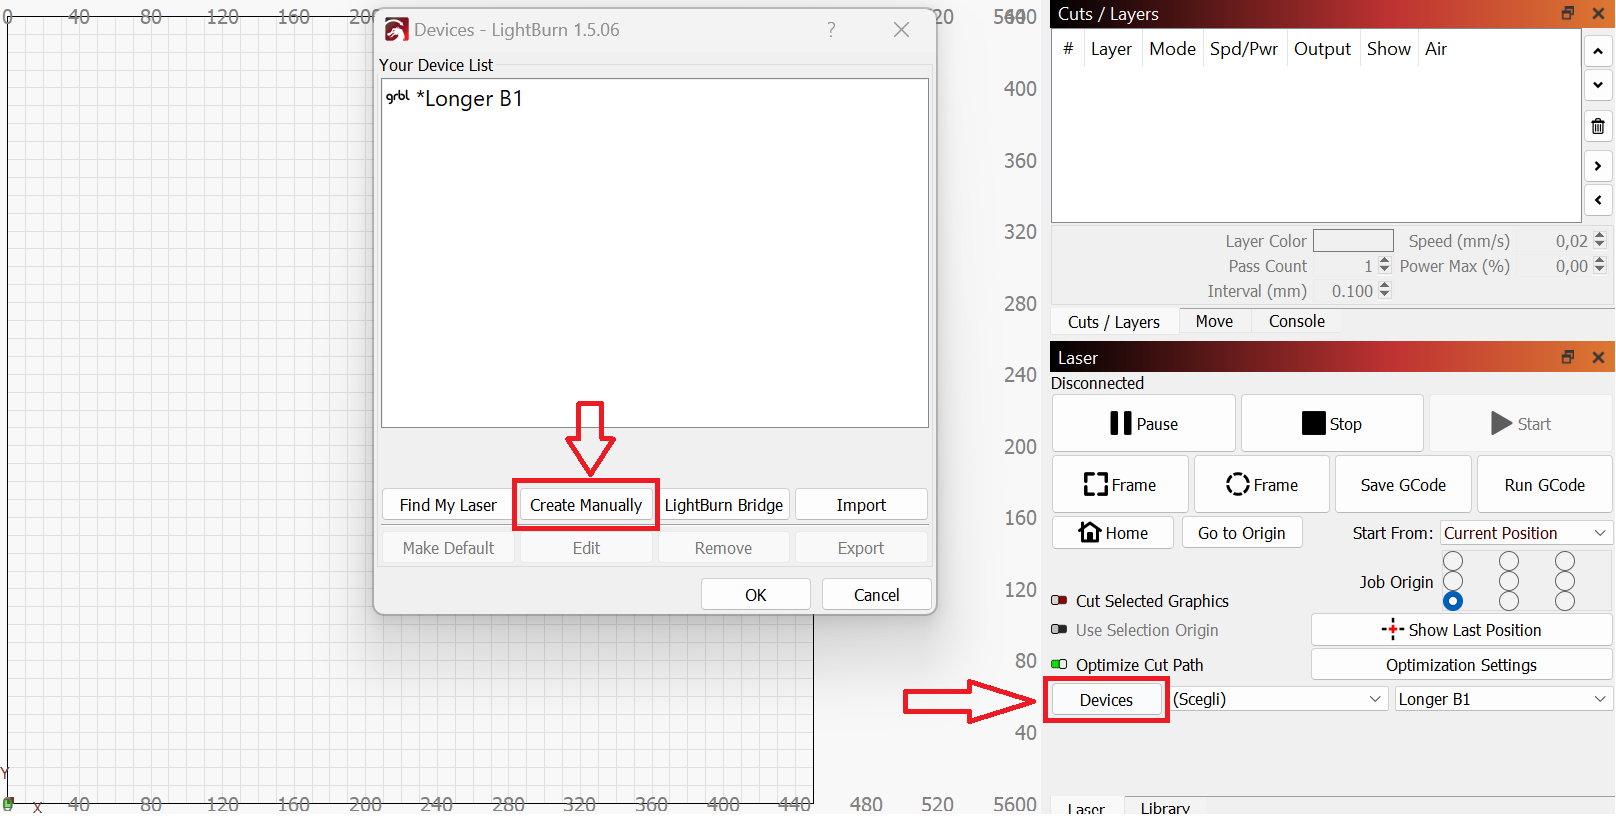
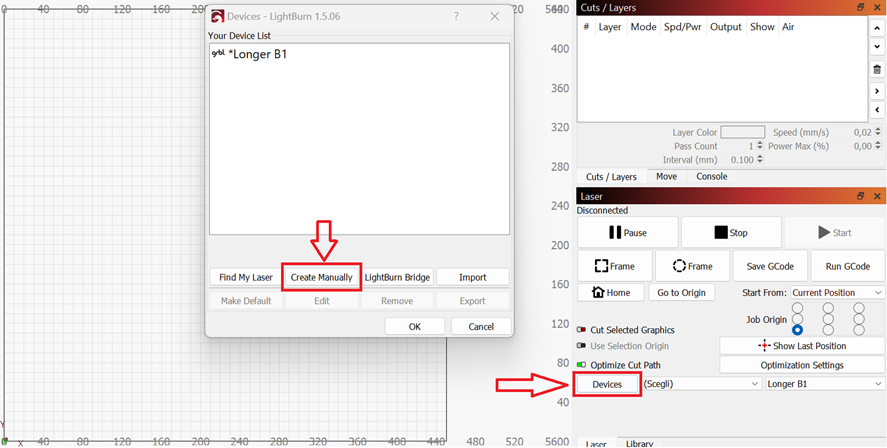
2.Click on "Devices", then click on "Create Manually" to add a new device

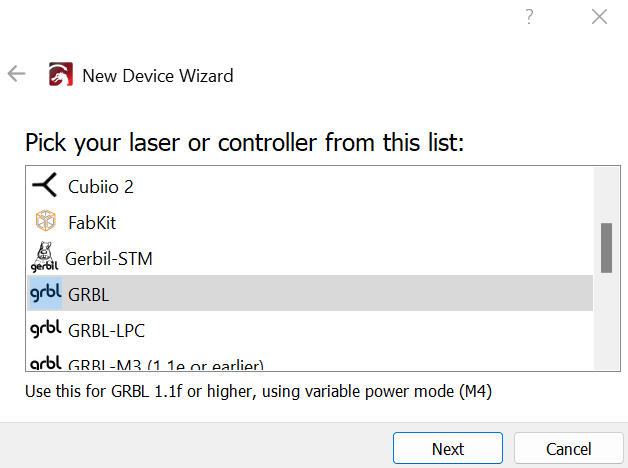
3.Select GRBL form the list, then click "Next" button

4.Select Ethernet/TCP and press "Next" button

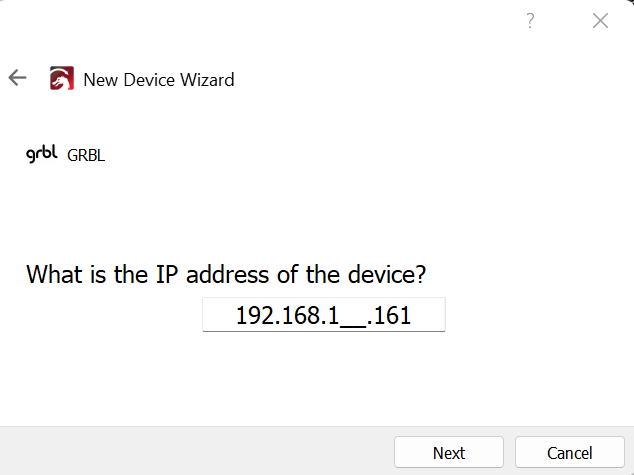
5.Enter the IP address you obtained earlier on the Longer B1 touchscreen (for example, 192.168.1.161)

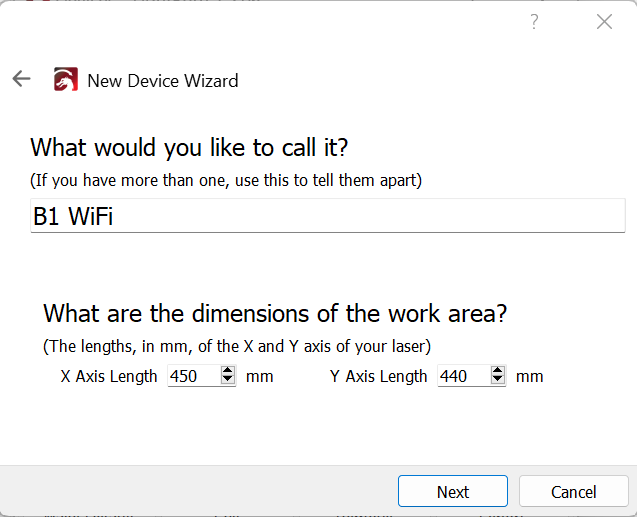
6.Enter the following data - Name: B1 WiFi / X = 450 / Y = 440

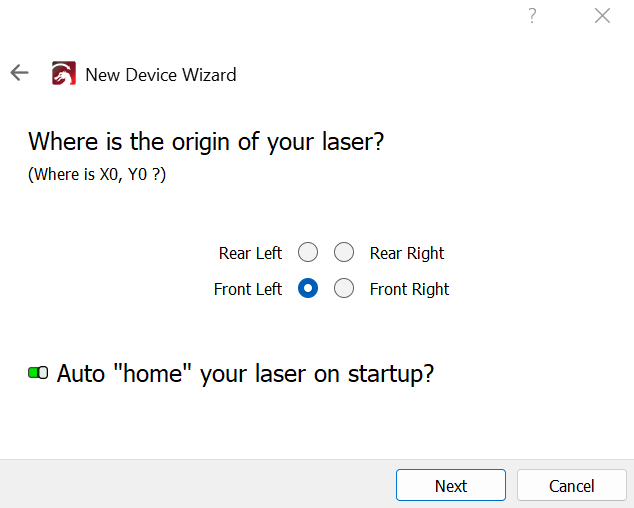
7.Select "Front Left" as your Origin and activate "Auto Home", then click "Next" button

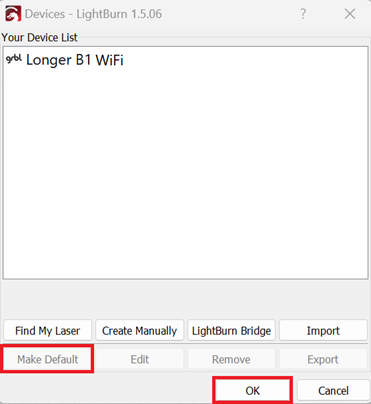
8.In the next window, press "Finish" to complete the setup, then select "B1 WiFi" and press "Make Default". Confirm with “OK” 

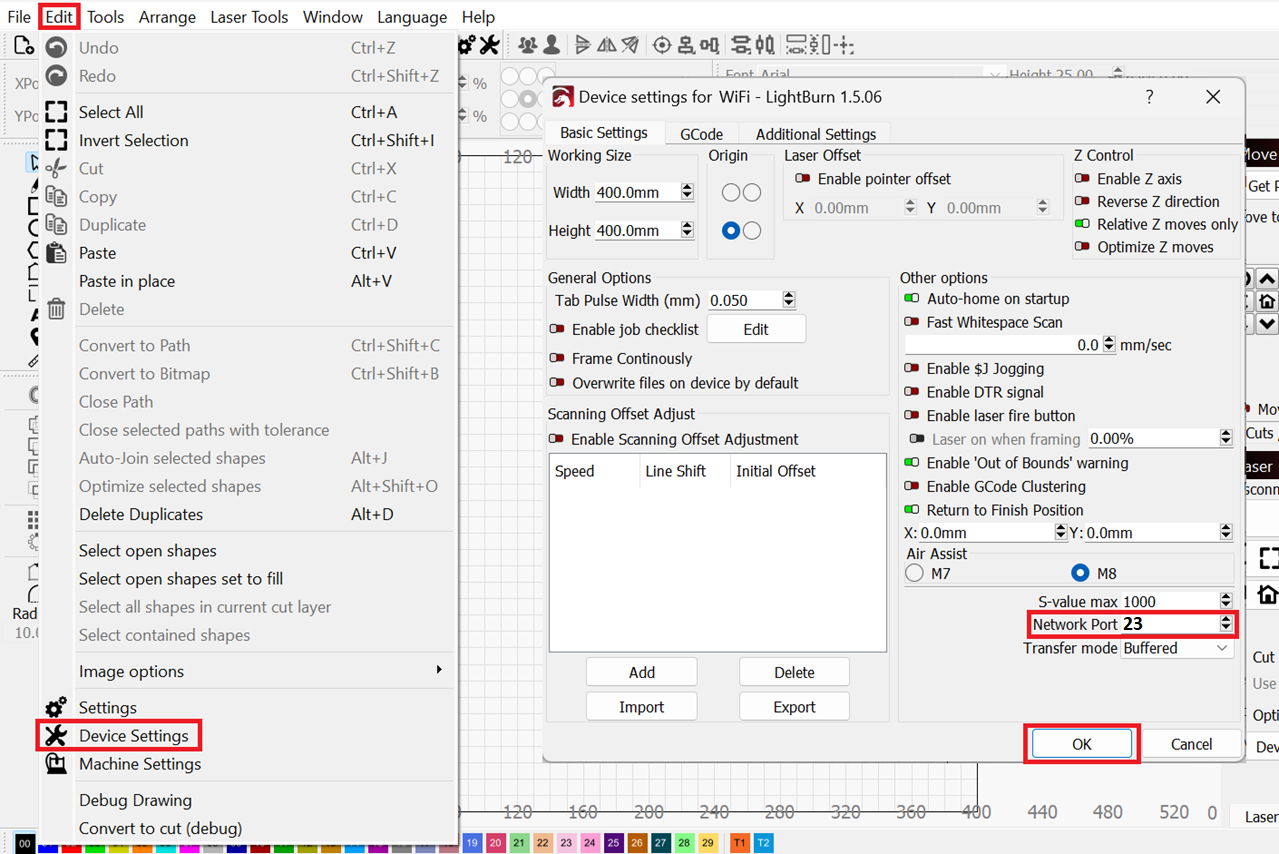
9.After successfully creating "B1 WiFi" you need to set up the correct Network Port. On the main screen, press "Edit" and then "Device Settings", then set "Network Port 23" and confirm with "OK"

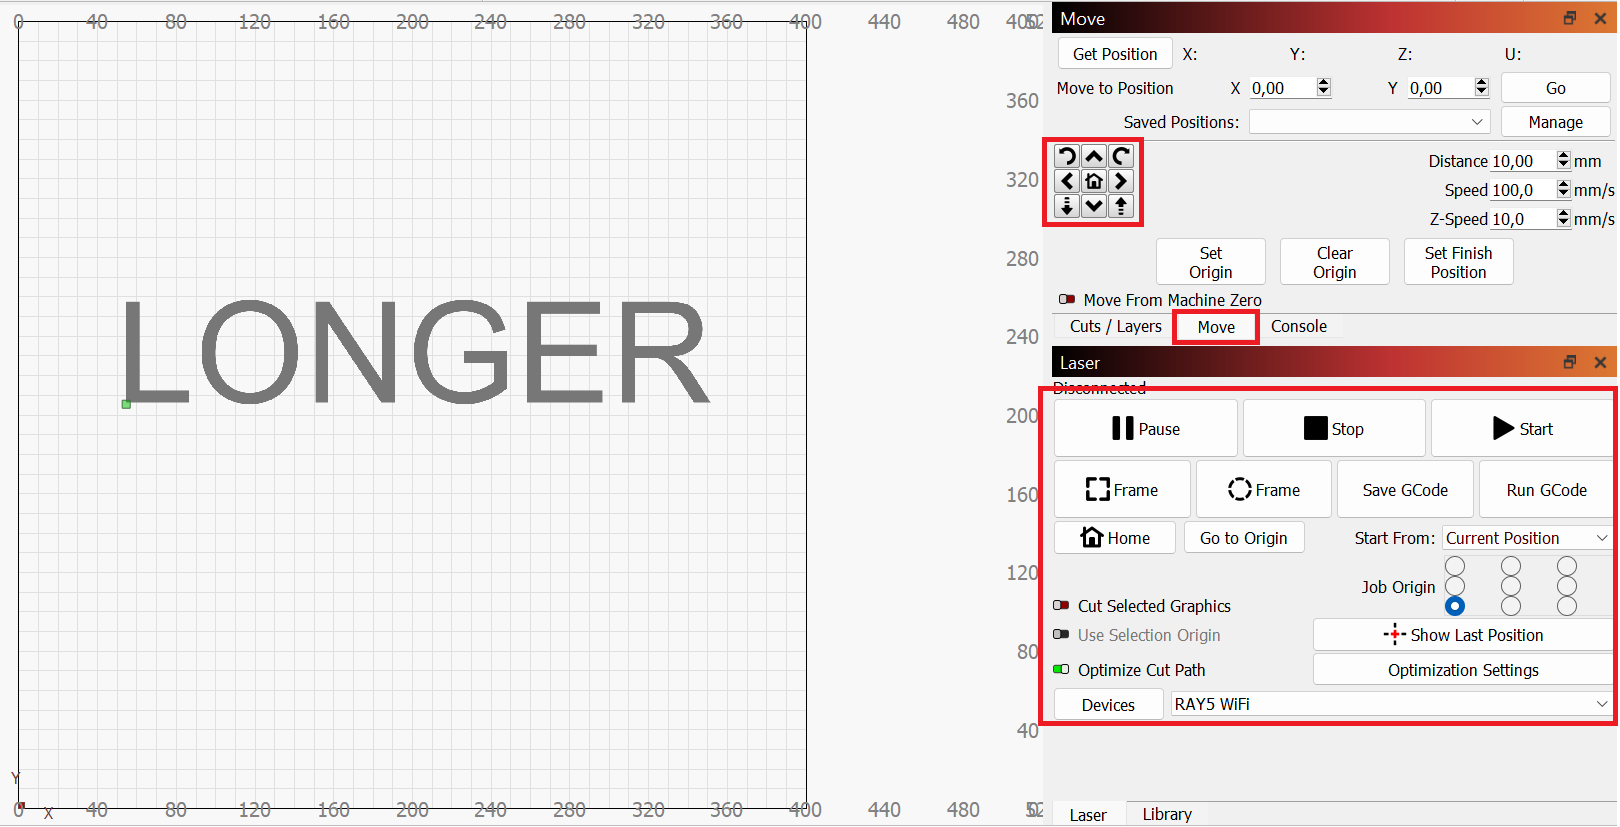
10.At this point, your B1 is ready to be used in LightBurn software in WiFi mode. Close Lightburn and restart it, and if everything has been done correctly, the connection status will change from "Disconnected" to "Ready", and it will be possible to move the laser module through the appropriate menu and start a laser engraving using the "Start" button, all without having to use any USB cable, but simply using the WiFi connection of your Router/AccessPoint

Please note that in order for the WiFi Bridge to work properly, both the Laptop and the Longer B1 must be connected to the same WiFi Router/AccessPoint.

By products-tutorial | June 24, 2024
LONGER Research: Advancements in Laser Engraving for Textile Production

Laser engraving is rapidly transforming textile production by offering a cleaner, more precise, and highly efficient alternative to traditional fabric processing methods. From fashion to industrial textiles, this technology enables manufacturers to achieve high-quality results while reducing environmental impact.

Sustainability: A Cleaner Alternative to Traditional Methods

Traditional textile processing often relies on water-intensive treatments and chemical-based dyes or finishes. In contrast, laser engraving offers a significantly more sustainable approach:

  • Minimal to no water consumption
  • Elimination of chemical dyes, inks, and solvents
  • Reduced environmental pollution and waste

By replacing conventional processes, laser engraving helps manufacturers meet growing demands for eco-friendly and responsible production.

Precision and Versatility Across Materials

Laser engraving delivers exceptional accuracy, enabling detailed patterns, textures, and markings on a wide range of fabrics, including:

  • Natural fibers (cotton, linen, leather)
  • Synthetic materials (polyester, nylon)
  • Blended textiles

The technology allows for clean, high-resolution engraving without direct physical contact, preserving the integrity of delicate materials.

The LONGER Laser B1 40W is particularly well-suited for non-metal and organic materials, offering consistent results with optimized energy efficiency.

High Efficiency and Scalable Production

Compared to traditional textile decoration methods such as screen printing or embroidery, laser engraving significantly improves production speed.

With a maximum working speed of up to 36,000 mm/min, the LONGER Laser B1 40W enables:

  • Faster turnaround times
  • Reduced labor dependency
  • Consistent output quality across batches

This makes it an ideal solution for both small-scale customization and larger production workflows.

Resource Optimization and Cost Efficiency

Laser engraving streamlines textile processing by eliminating the need for consumables such as:

  • Inks
  • Dyes
  • Chemical treatments
  • Printing screens

This not only reduces operational costs but also improves resource efficiency and workflow simplicity, making production more sustainable and economically viable.

Impact on Fashion Design

Laser engraving technology has greatly impacted the fashion industry by providing designers with innovative methods to create new patterns, add tactile elements to apparel, and customize intricate designs on fabrics. Here are some examples of innovative fashion designs leveraging laser engraving technology:


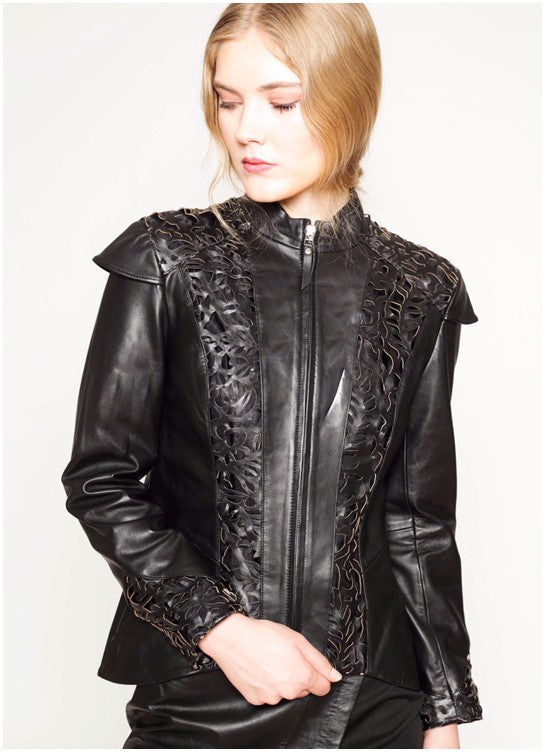
Laser Engraved Leather Jackets: Fashion designers use laser engraving to carve distinctive and artistic motifs on leather. This technology enables the creation of intricate designs, such as floral patterns or geometric shapes, on leather surfaces.


Laser Cut Lace Dresses: Laser engraving allows for the creation of fine lace patterns on fabrics, enhancing the beauty and elegance of lace dresses. This technique adds a touch of class and sophistication to these garments.


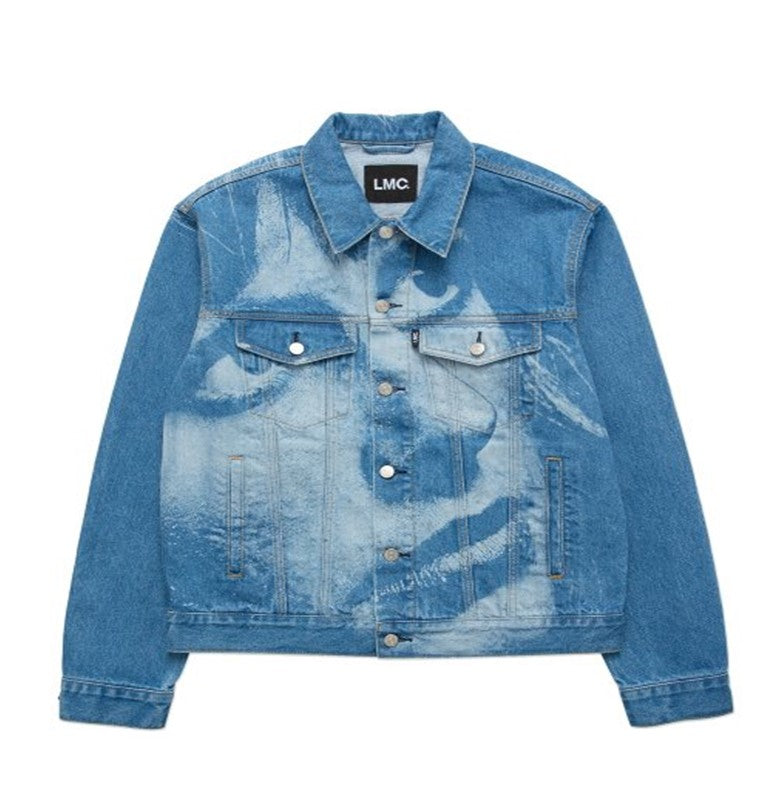
Laser Engraved Denim: Laser engraving produces beautiful designs on denim fabric. Patterns, messages, and logos can be etched onto denim, giving wearers unique and distinguished looks in the fashion world.


Laser Cut Accessories: Laser engraving technology is crucial for creating fine and intricate designs on accessories such as handbags, belts, and shoes. The precision of laser engraving adds stylish elements to these fashion accessories.


Laser Engraved Textiles: A new trend in fashion involves applying laser-engraved designs to textiles like silk, cotton, and synthetic fabrics. Designers can experiment with different textures and patterns, resulting in visually appealing and innovative textile designs.

Conclusion

These examples illustrate how advancements in laser engraving are transforming fashion design, enabling more detail, customization, and nuanced patterns. Fashion designers should explore the possibilities of laser engraving technology, as it can produce impressive and unique results, bringing creativity and precision to their work.


The Longer Laser B1 40W, with its powerful capabilities, is an ideal choice for those looking to enhance their textile production. It features diode laser technology with a 40W optical output, a working area of 450x440mm, a fixed focus of 50mm, and a fine laser spot size of 0.1x0.15mm. These specifications ensure detailed and precise engravings, making it perfect for both intricate artistic projects and large-scale industrial applications. The Longer Laser B1 40W stands out among the best laser engravers on the market, offering exceptional performance for wood engraving, stone engraving, metal business cards, and jewelry engraving.


By products-tutorial | June 14, 2024
LONGER Research: Ray5 20W Medical Device Laser Marking

Laser marking is essential in the medical device industry, offering permanent, precise markings on various materials. LONGER, a leading brand in laser engraving and cutting machines, provides cutting-edge solutions for medical device laser marking. Here, we explore the applications and advantages of LONGER laser technology in this field, focusing on the exceptional capabilities of the Ray5 20W -20 watt laser engraver.

Unparalleled Precision with Dioser Technology
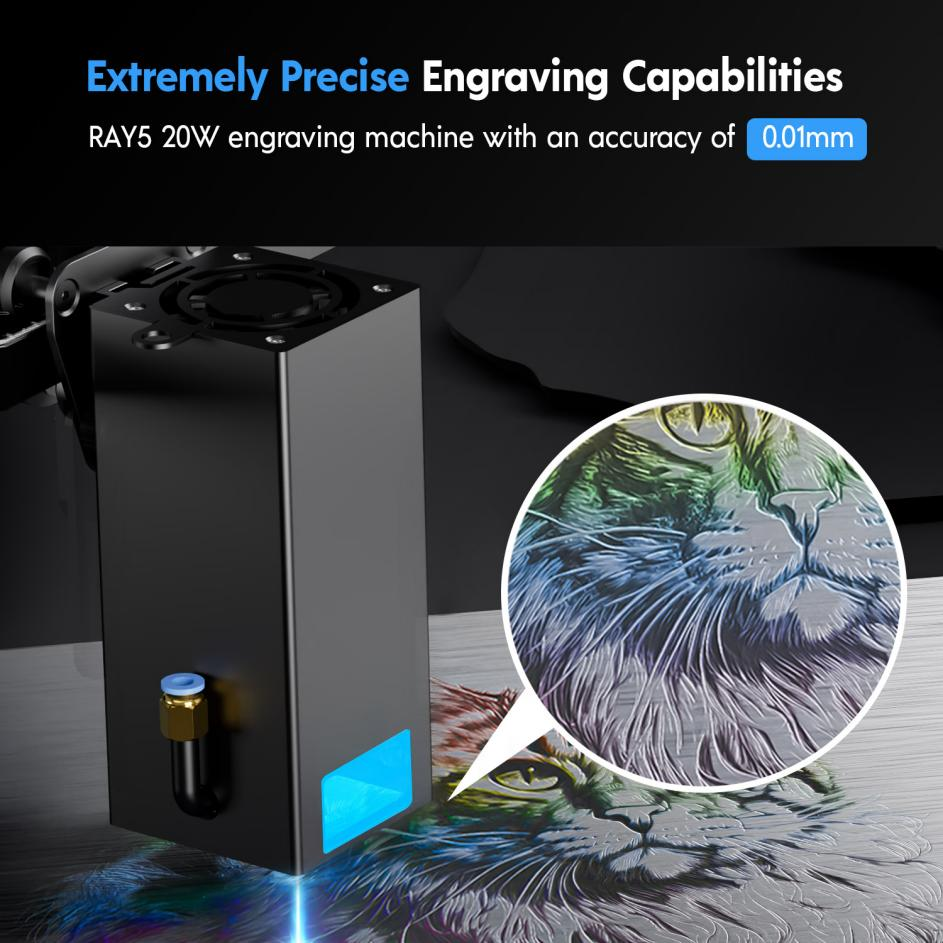
The LONGER Ray5 20W laser engraver employs Dioser Technology, delivering unmatched accuracy with a working area of 400 x 365 mm (15.7 x 14.4 inches). The 450nm laser wavelength and fixed focus of 40mm ensure precise and intricate markings. With a laser spot size of 0.08x0.1mm, the Ray5 20W can produce the finest details, industrial laser cutters, making it ideal for medical device marking where precision is paramount.

Efficient and Versatile Performance

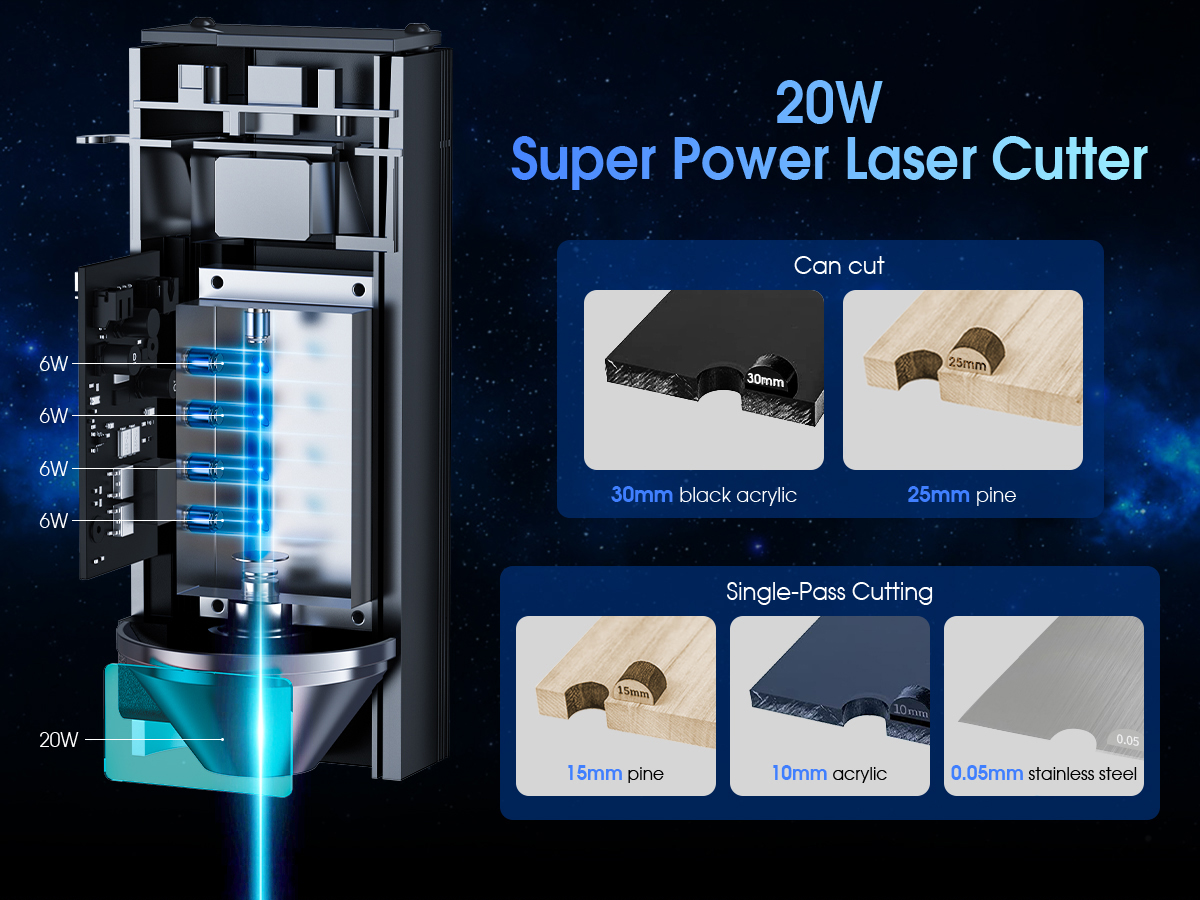
The Ray5 20W boasts an optical output power of 20W and a maximum power consumption of 120W. Its Z-axis height range of up to 47mm and fastest working speed of 10000mm/min allow for efficient processing of various materials. The engraver can cut through 12mm plywood, 15mm pine, 8mm acrylic in one pass, and even handle up to 25mm pine wood, 35mm acrylic, and 0.05mm stainless steel, showcasing its versatility in handling different substrates used in medical devices.

Robust and Reliable Design

Designed for durability, the Ray5 20W features a 32-bit motherboard and has a laser head life of over 10,000 hours. It operates within a temperature range of -20 to 50℃, ensuring consistent performance in various environments. The engraver meets FDA Class II and Class 2 IEC standards, underscoring its compliance with stringent safety regulations crucial in the medical field.

Advanced Safety Features

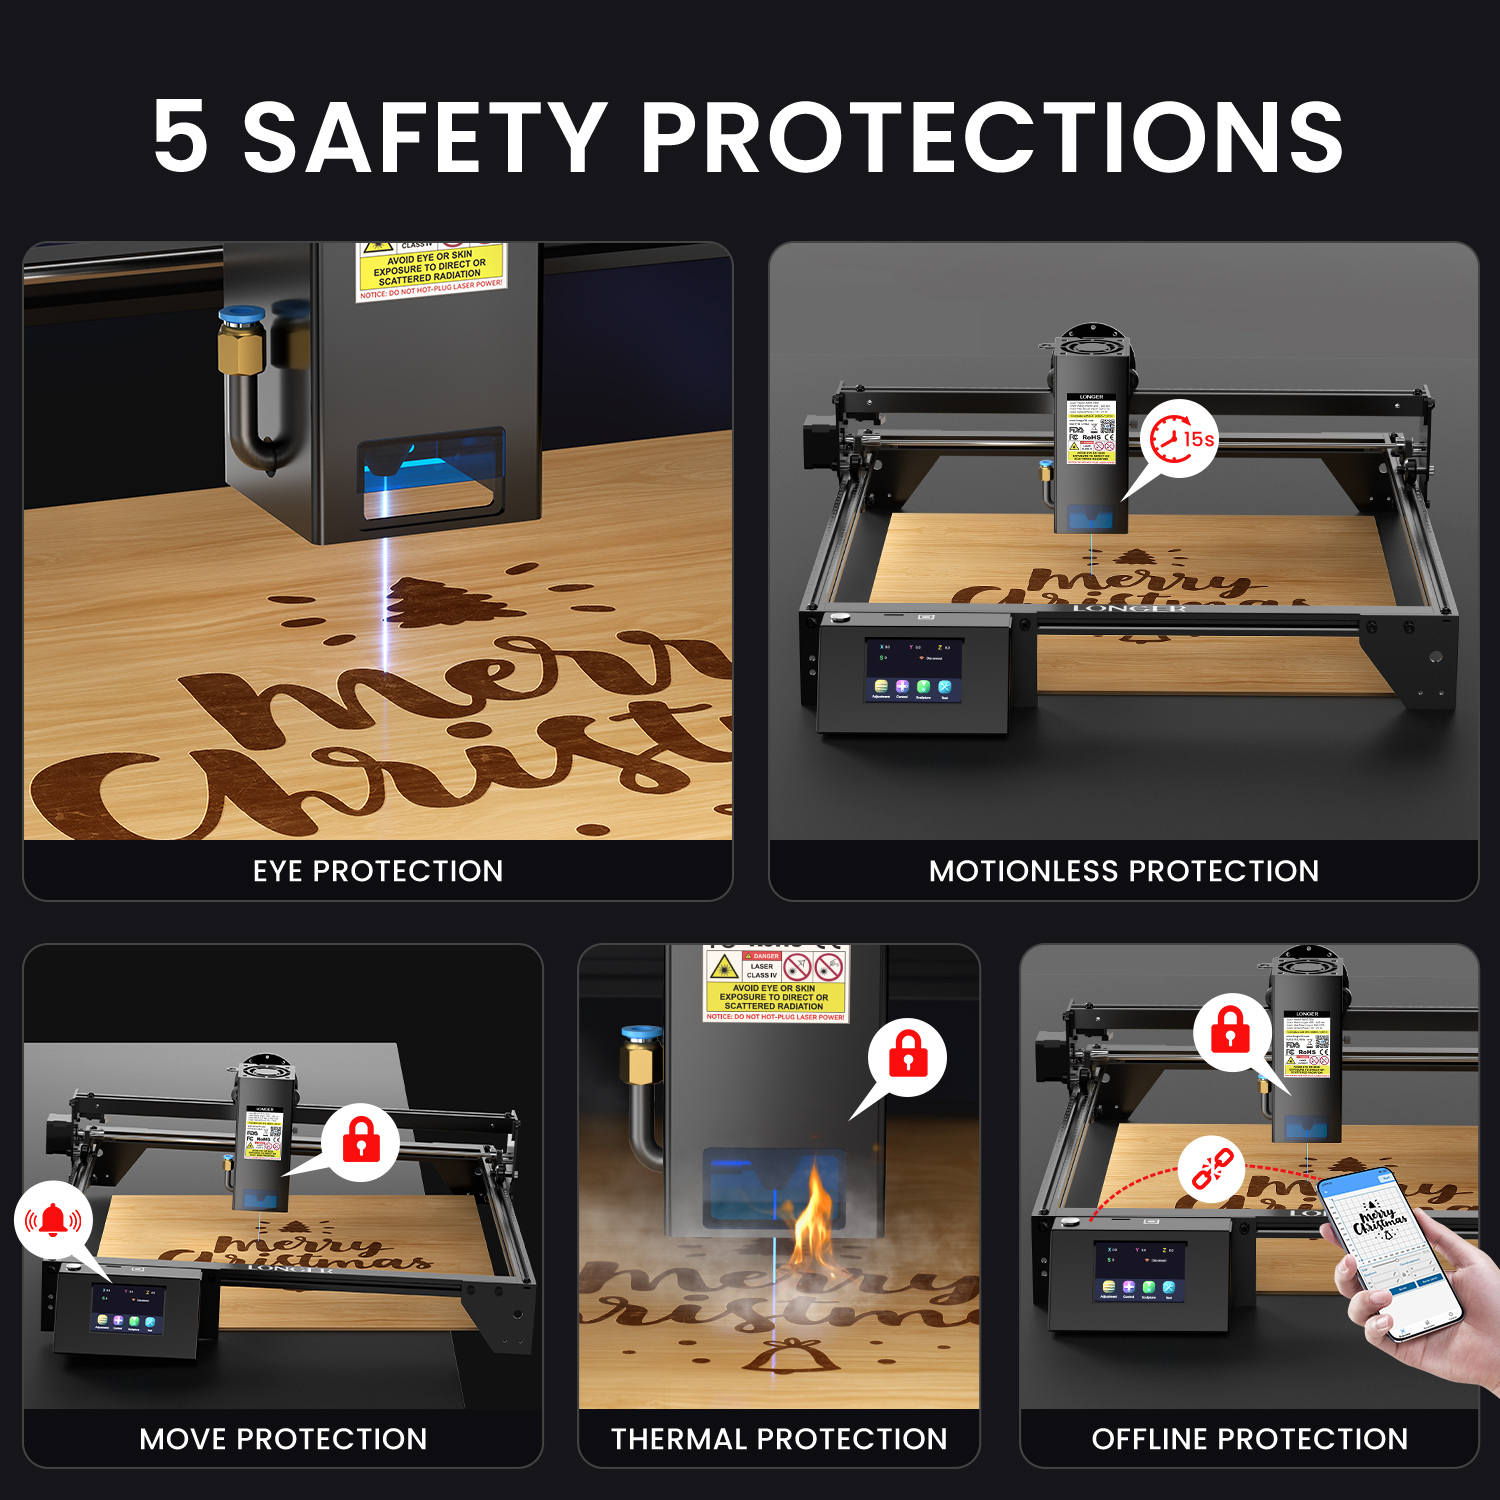
Safety is paramount when working with lasers, especially in medical device manufacturing. The Ray5 20W includes multiple safety features such as flame detection, movement detection, motionless protection, an emergency stop button, and built-in eye protection. These features ensure operator safety and compliance with regulatory standards, providing peace of mind during operation.

User-Friendly Operation

LONGER laser engravers are designed with user convenience in mind. The Ray5 20W supports offline engraving and can be controlled via PC, mobile devices, and through software like LaserGRBL (free), LightBurn (paid), and the MKS APP. Compatible with Windows, macOS, Linux, Android, and iOS, this machine offers flexibility and ease of use. Its touch screen interface allows users to effortlessly adjust settings and monitor progress, enhancing efficiency and productivity.

Compact and Portable Design

The Ray5 20W’s moderate size (61 x 67 x 20 cm) and weight (5.51 kg) make it perfect for desktop use or even portable applications. This compact design allows for a mobile workspace, enabling easy relocation if needed.

Commitment to Quality and Compliance

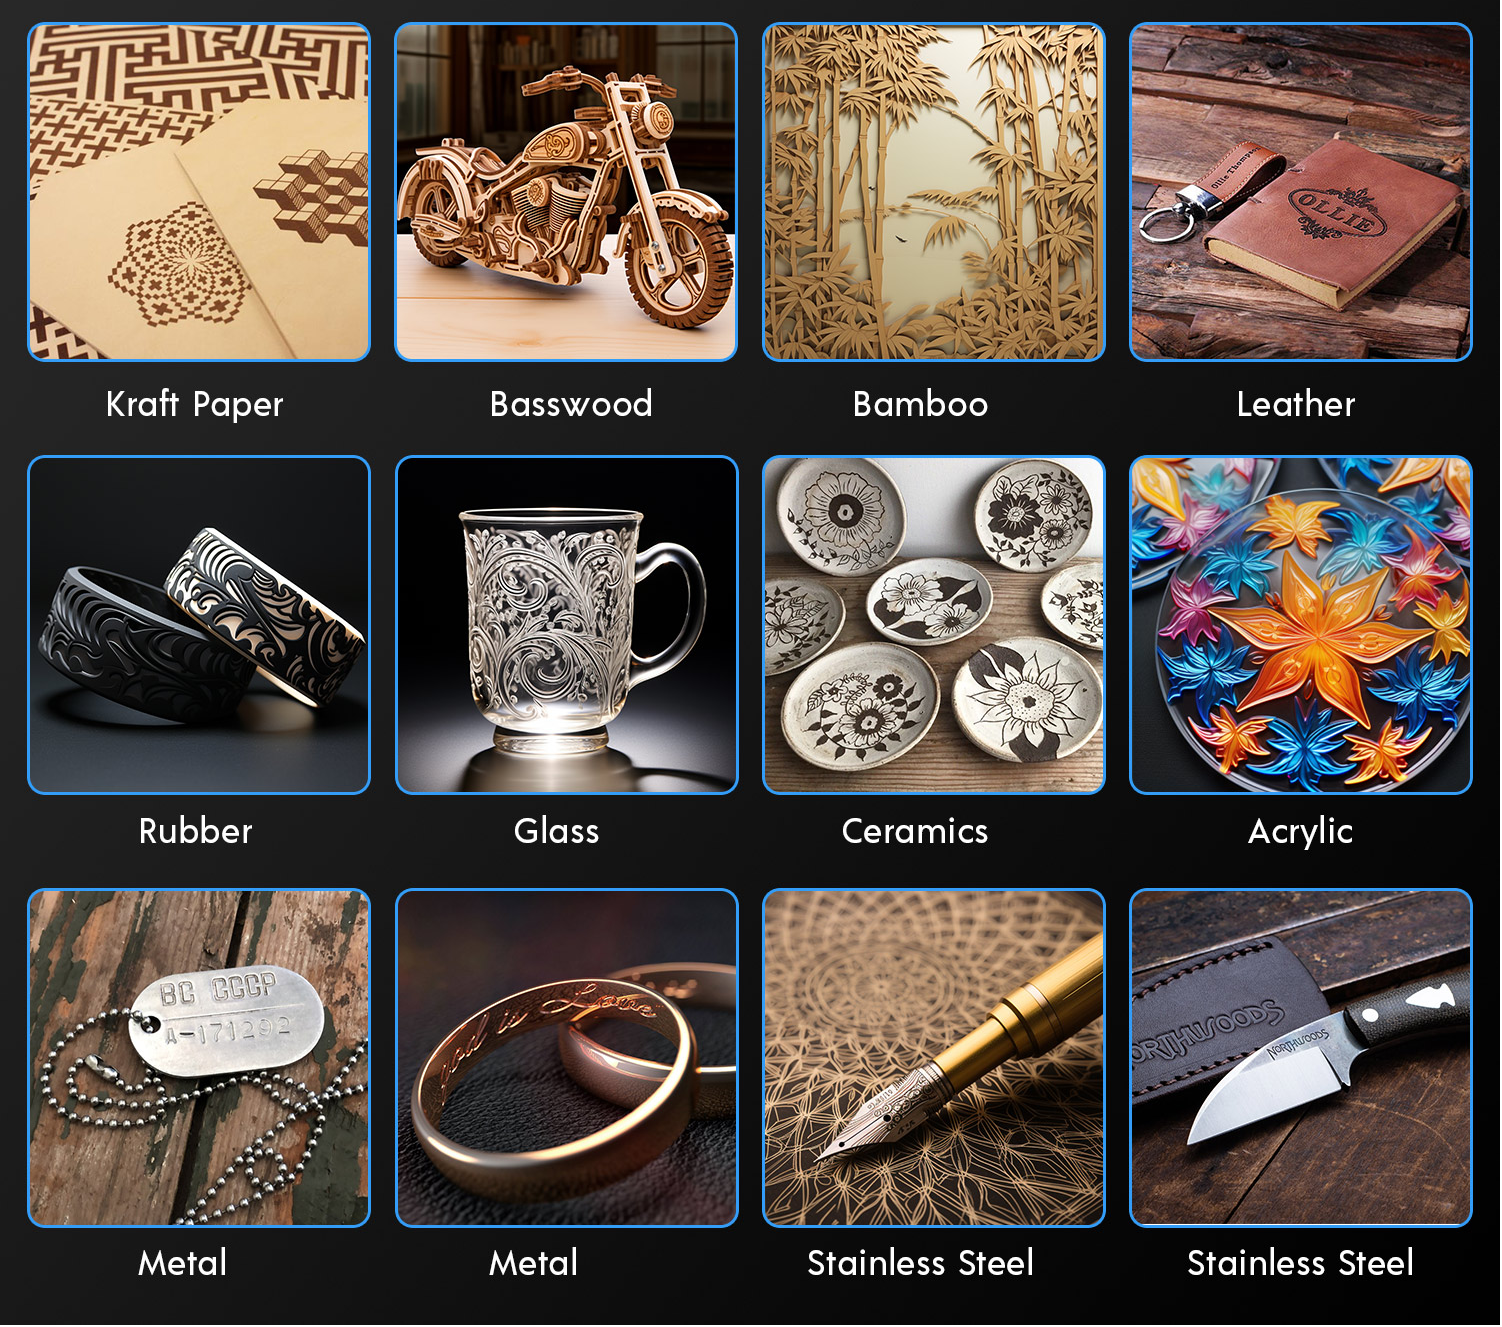
Medical devices must adhere to strict regulatory guidelines. The Ray5 20W ensures compliance with these standards, making it suitable for marking unique device identifiers (UDIs), lot numbers, serial numbers, barcodes, logos, and other relevant data on medical devices. Its ability to adjust laser wavelength, power, and parameters ensures optimal marking on different materials like metals, plastics, ceramics, and glass.

Continuous Innovation and Support

Since its inception, LONGER has been committed to innovation and quality. From acquiring RepRapPro and launching groundbreaking 3D printers to setting new benchmarks in laser engraving technology, LONGER has consistently pushed the boundaries. The introduction of the Ray5 20W laser engraver is another testament to this dedication, providing unmatched precision, reliability, and safety.

Conclusion

LONGER’s Ray5 20W laser engraver represents a significant advancement in medical device marking technology. Its precision, efficiency, and safety features make it an invaluable tool for manufacturers. By continuing to innovate and adhere to stringent quality and safety standards, LONGER remains at the forefront of the industry, ensuring that their customers receive the best solutions for their needs. Join us in our pursuit of excellence and make it better with LONGER.


By products-tutorial | May 21, 2024
Lens Cleaning for Longer B1 30W & 40W

Longer B1 30W & 40W has a laser module capable of engraving and cutting multiple types of materials. However, depending on the type of work that is carried out, it is possible that a fair amount of smoke is produced, which can inevitably settle on the lens of the laser module and therefore blur it. Once the lens of the laser module is dirty or clouded, the laser beam can no longer pass through it and therefore the emission of the laser module is drastically reduced. As a consequence, more and more power will be needed to engrave the same materials already engraved previously, until it will be practically impossible to engrave any type of material even setting 100% power. This problem occurs most when an air assist system is installed but not enabled; In fact, an Air Assist system allows you to create air pressure in the vicinity of the lens, thus preventing smoke and dust from settling easily on the lens. 

In order to solve this problem, it is necessary to proceed to cleaning the lens of the laser module; Once the lens is cleaned, the laser beam can pass through it without suffering losses and therefore the materials will be engraved or cut again to perfection. 


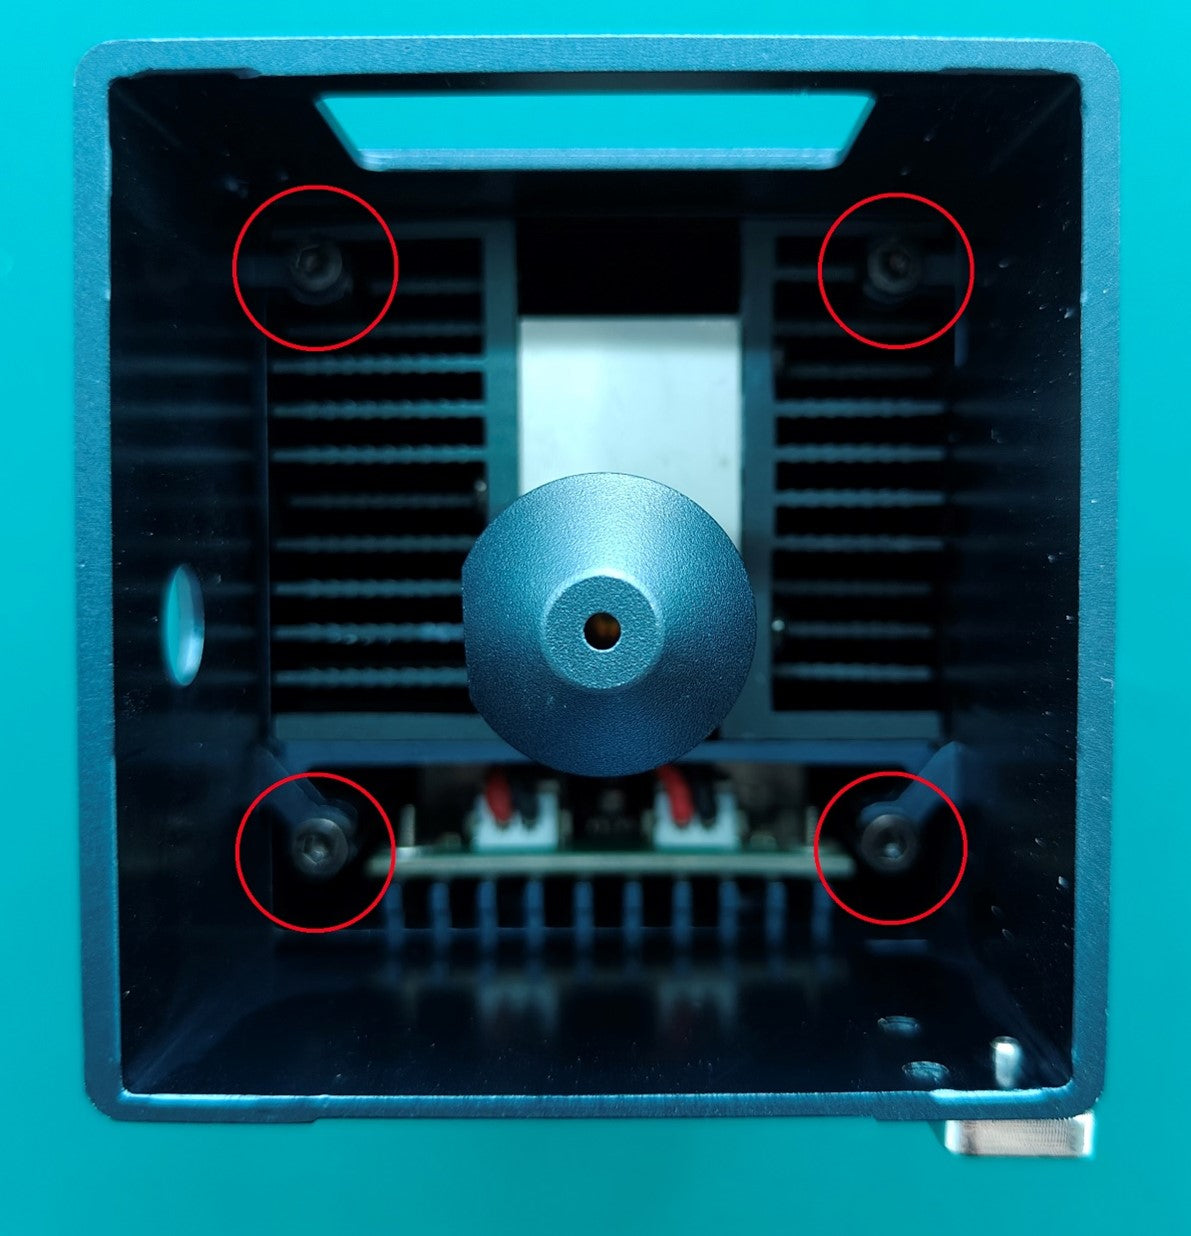
To proceed with the cleaning of the lens of the laser module of Longer B1 30W & 40W it is necessary first to completely disassemble the laser module. After separating the laser module from the rest of the machine, remove the four screws shown in the figure:

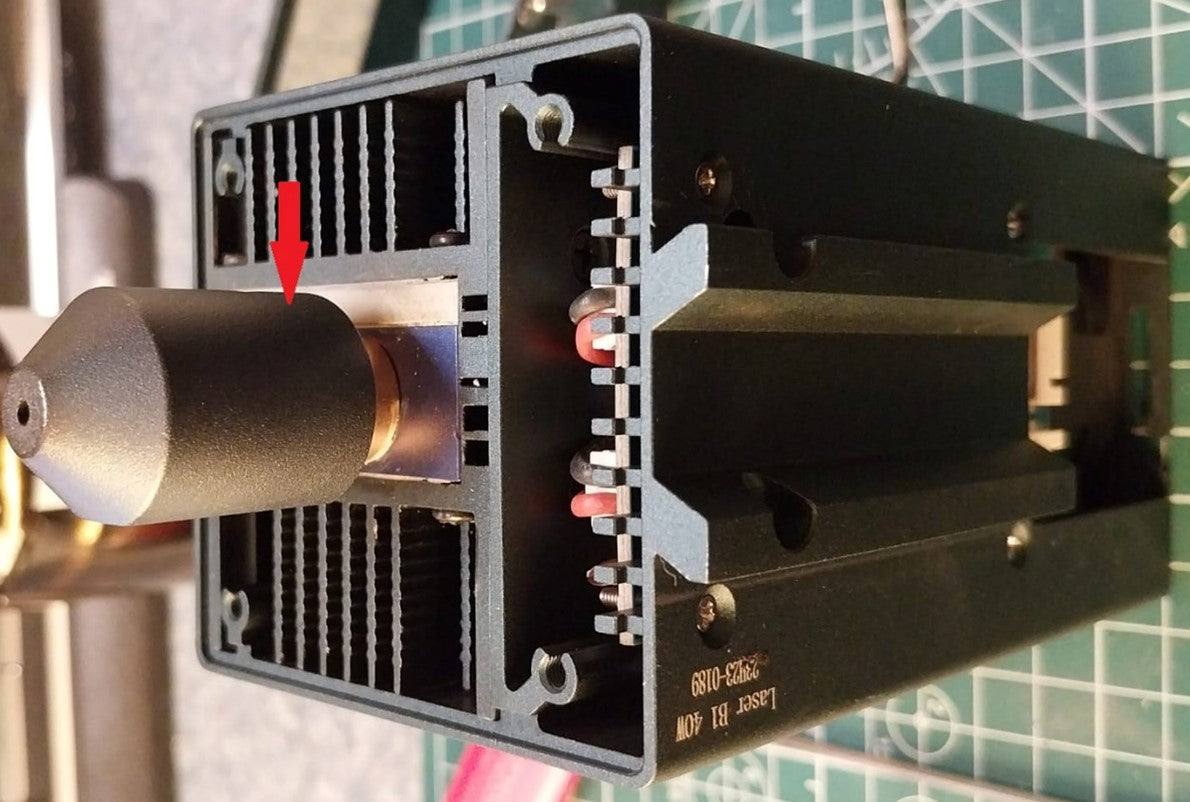
Once the four screws have been removed, the protective shield will be removed from the laser module, which will appear as shown in the figure. At this point, to remove the air assist nozzle, unscrew the small screw located on the side of the nozzle.

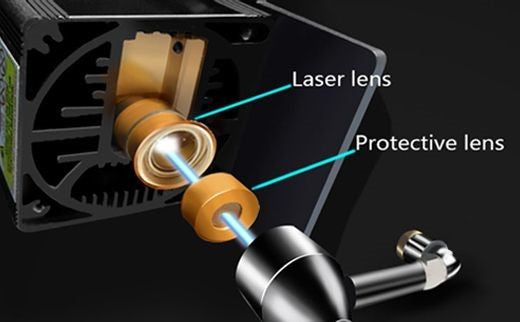
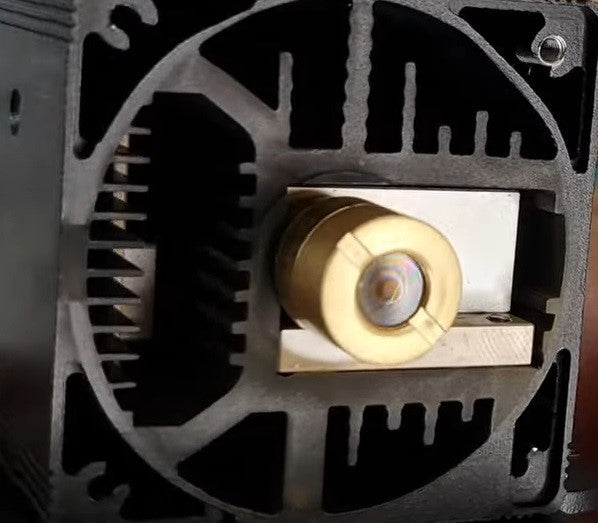
The laser module of the Longer B1 30W & 40W has a factory-installed protective lens, which can be unscrewed and cleaned separately from the laser module. This lens is a simple protective glass, and has no focusing function, for this reason it can be removed and cleaned/replaced. After removing the protective lens, you can proceed to clean the lens with the use of a cotton swab soaked in alcohol. Be careful to prevent alcohol from entering the inside of the lens. 

Use one or more cotton swabs soaked in alcohol, until the lens is completely clean and free of dirt; at this point, therefore, you can proceed to screw it to the laser module and reassemble the laser module of Longer B1 30W & 40W. At the end of the cleaning procedure, you can proceed to engrave a sample file contained in the microSD card of Longer B1 30W & 40W, so you can evaluate the total restoration of the functionality of the laser module. If the lens is too much dirty and cannot be cleaned, you can contact us for buying a replacement spare part. In order to keep the lens always clean, remember to keep enabled the air assist, this will help the engraving quality. 

By products-tutorial | May 15, 2024
Lightburn WiFi Bridge - Longer Ray5

Longer Ray5 adopts an MKS DLC32 mainboard, characterized by USB connectivity, wireless technology, microSD card reading, touchscreen display with graphic interface and total interaction with your smartphone through the MKSLaser application. 


The most common method of using Longer Ray5 is to connect the machine to your Laptop via a USB connection, or by exporting a gcode file to be run via the Longer Ray5 microSD. However, there is also an intermediate mode of operation, based on WiFi connectivity, which allows you to use Lightburn and Longer Ray5 without a USB cable. 


Connecting the Laptop and Longer Ray5 with a USB cable requires them to be within a short distance of each other, as the maximum extension of a USB cable is about 3 - 5 meters. On the other hand, connecting the Laptop with Lightburn and Longer Ray5 wirelessly allows you to position yourself at a greater distance, so as to obtain good greater security during the engraving process. For this reason, using Lightburn in WiFi mode offers numerous advantages in terms of security and efficiency, thus expanding the user's comfort and versatility of Longer Ray5. 


In order to connect Longer Ray5 and Lightburn wirelessly, you first need to complete the WiFi setup process on your Longer Ray5. To do this, proceed as follows. 

1.    Tap the tool icon on the touchscreen's home page

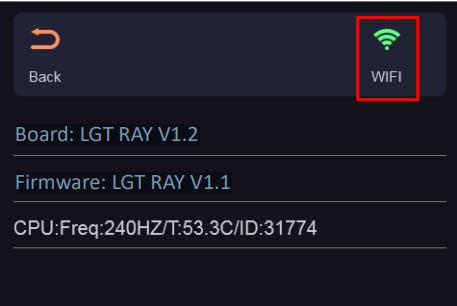
2.    Tap Wi-Fi icon on the top right corner of tool page

Tap the tool icon on the touchscreen's home page


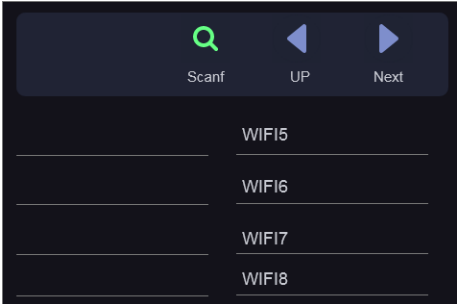
3. Select Wi-Fi name on Wi-Fi list page and enter password and waiting for connect to the WiFi Router/AccessPoint you selected

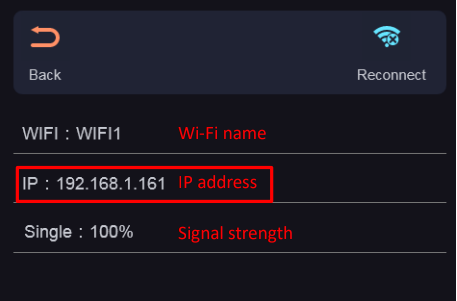
4. Check the current connected Wi-Fi status and take note of the IP address provided on the touchscreen

Once the Longer Ray5 has been successfully connected to the WiFi Router/AccessPoint and the IP address has been successfully provided and noted, proceed to open Lightburn on your Laptop. At this point, proceed as follows. 

1. Connect your Laptop to the same WiFi Router/AccessPoint to which you have connected Longer Ray5

2. Click on "Devices", then click on "Create Manually" to add a new device

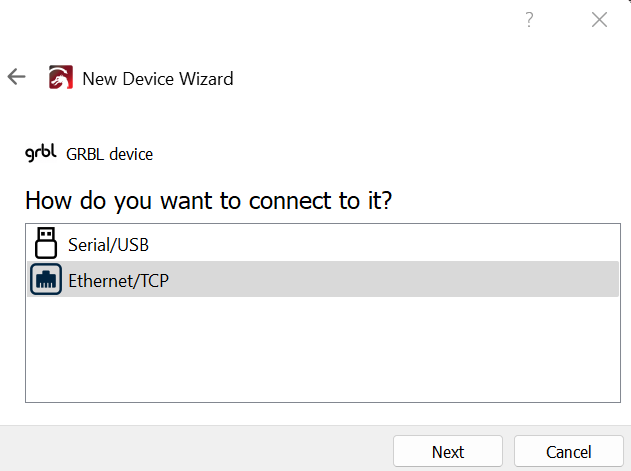
3. Select GRBL form the list, then click "Next" button

4. Select Ethernet/TCP and press "Next" button

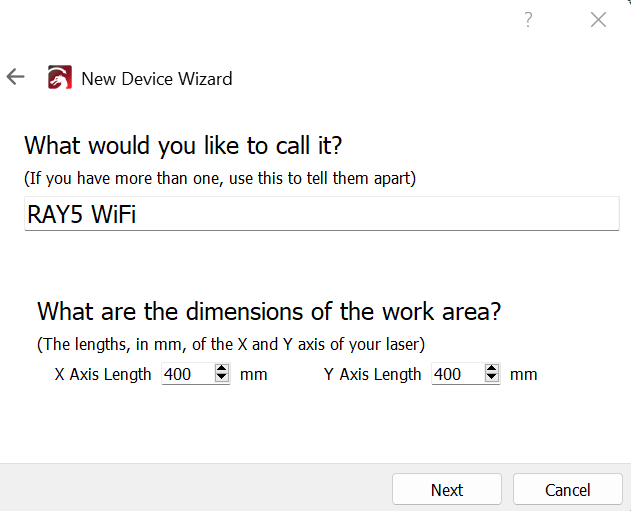
5. Enter the following data - Name: RAY5 WiFi / X = 400 / Y = 400

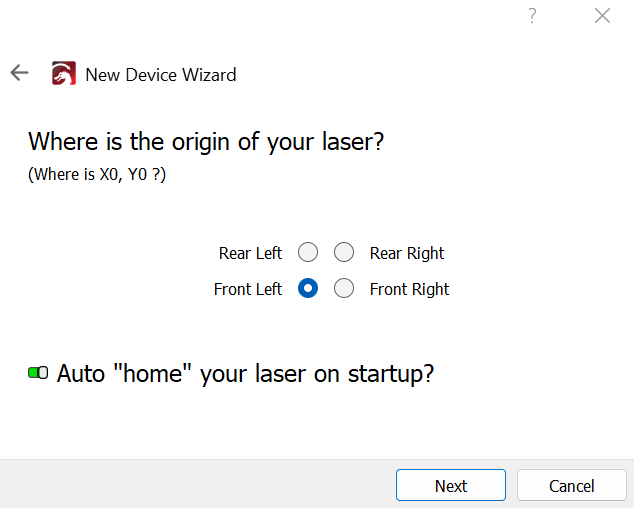
6. Select "Front Left" as your Origin and activate "Auto Home", then click "Next" button

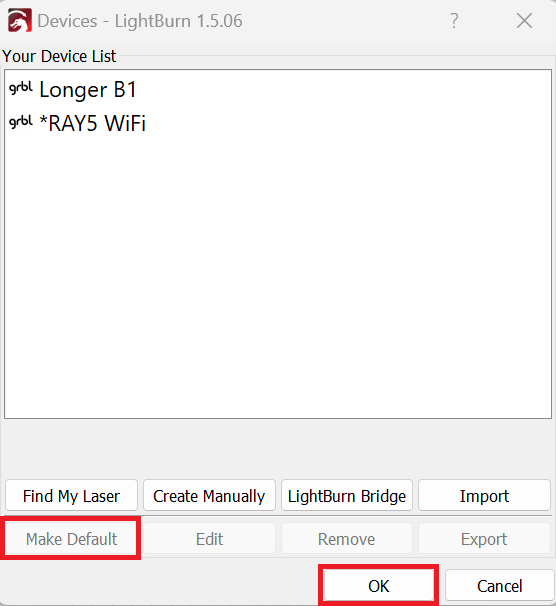
7. In the next window, press "Finish" to complete the setup, then select "RAY5 WiFi" and press "Make Default". Your RAY5 is ready to be used in LightBurn software in WiFi mode

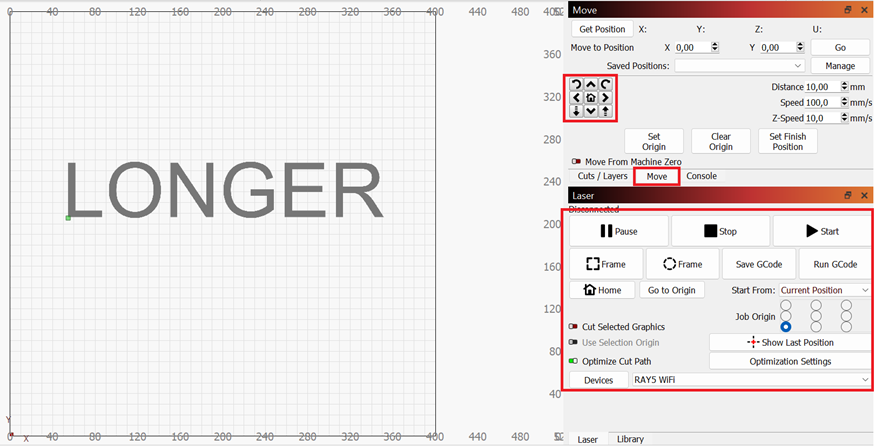
8. At this point, if everything has been done correctly, the connection status will change from "Disconnected" to "Ready", and it will be possible to move the laser module through the appropriate menu and start a laser engraving using the "Start" button, all without having to use any USB cable, but simply using the WiFi connection of your router/access point.

Please note that in order for the WiFi Bridge to work properly, both the Laptop and the Longer Ray5 must be connected to the same WiFi Router/AccessPoint.

By products-tutorial | May 14, 2024
Longer Laserburn App – Multiple Work Layer

Using LaserBurn multiple work layers is one of the easiest ways to speed up laser projects and combine different operations into one workflow. Instead of running separate engraving and cutting jobs, LaserBurn allows users to create multiple tasks inside a single project using layers.

For Longer B1 users and beginners learning laser workflows, this feature can reduce setup time, improve efficiency, and simplify project management.


Table of Contents


Quick Answer

LaserBurn multiple work layers allow you to assign different operations to different objects inside the same project. Each layer can use its own processing parameters and operation type, such as engraving or cutting, so the machine can automatically complete multiple jobs in sequence during one run. LaserBurn supports up to 10 layers.


What This Guide Covers

This tutorial explains:

  • What LaserBurn work layers do
  • How to assign multiple layers
  • How to combine engraving and cutting jobs
  • How Longer B1 processes layer-based tasks
  • Common issues and solutions
  • Helpful tips for beginners

Why LaserBurn Multiple Work Layers Matter

Laser projects often contain different operations.

For example:

  • Engraving logos
  • Cutting outlines
  • Creating text effects
  • Producing multi-color metal engravings
  • Combining decorative elements with cut shapes

Without layers, users would typically:

  1. Run engraving
  2. Stop the machine
  3. Reload files
  4. Reposition materials
  5. Run cutting

This takes more time and increases the possibility of alignment errors.

With LaserBurn multiple work layers:

  • Multiple jobs run continuously
  • Material stays in place
  • Workflow becomes easier
  • Production time decreases

LaserBurn was designed specifically for LONGER laser machines and includes integrated layer management functions.


Before You Start

Requirements

Hardware:

  • Longer B1 laser engraver
  • Compatible LONGER laser machine
  • Suitable engraving material

Software:

  • LaserBurn application
  • Existing design file or imported artwork

Knowledge:

  • Basic LaserBurn navigation
  • Understanding of engraving and cutting operations

If additional machine settings are required:

Follow official machine specifications or instructions.


Precautions

Before beginning:

  • Verify that the laser is properly focused
  • Confirm your material is secured
  • Ensure airflow or air assist functions properly
  • Double-check object placement
  • Review assigned layer settings before starting

Common beginner mistake:

Assigning multiple objects to the same layer unintentionally can apply incorrect processing parameters.


Step-by-Step: How to Use LaserBurn Multiple Work Layers

Step 1: Create or Import Images

Action:

Open the Creation menu and create or import the images you want to process.

The example workflow uses:

  • "Longer"
  • "B1"

Expected Result:

Both designs appear in the project workspace.

Important Notes:

Objects can be newly created or imported from existing files.


Step 2: Open the Layers Menu

Action:

Locate the Layers menu.

For each imported image, select a different layer.

Click different layer colors to assign unique layers.

Expected Result:

Each object changes color according to its assigned layer.

Important Notes:

Layer colors are visual indicators that help distinguish operations.

LaserBurn supports up to 10 separate layers


Step 3: Assign Processing Parameters

Action:

Set processing parameters for each layer independently.

Example:

  • "Longer" → wood engraving parameters
  • "B1" → wood cutting parameters

Expected Result:

Each layer now contains independent settings.

Important Notes:

Different layers can contain:

  • Engraving settings
  • Cutting settings
  • Speed settings
  • Power settings
  • Processing behaviors

Do not modify settings unless your material specifications require changes.

Follow official machine specifications or instructions.


Step 4: Position Material Under the Laser Module

Action:

Place the wooden panel beneath the Longer B1 laser module.

Expected Result:

Material is positioned and ready for processing.

Important Notes:

Do not move the material after setup.

Movement may affect alignment between operations.


Step 5: Start the Job

Action:

Start the created project in LaserBurn.

Expected Result:

The machine processes tasks automatically:

  1. Engraves "Longer"
  2. Cuts "B1"

The operations run continuously without interruption.

Important Notes:

The machine processes operations according to layer sequence.

Do not interrupt the machine unless necessary.


LaserBurn Multiple Work Layers for Metal Color Engraving

One useful application of multiple layers involves colored metal engraving.

Laser interaction with metal can create different visible colors depending on:

  • Laser power
  • Speed
  • Processing conditions

Multiple layers allow different settings to be applied across sections of the design.

This creates multi-tone visual effects while remaining inside a single project.

If processing metal materials:

Follow official machine specifications or instructions.


Common Problems and Solutions

Problem Requirements Solution
Objects use identical settings unexpectedly Check layer assignment Verify objects are assigned to separate layers
Design colors do not change Review Layers menu Reassign layer colors
Engraving starts but cutting does not Verify operation settings Confirm cutting parameters are assigned correctly
Alignment appears incorrect Material positioning Do not move material after setup
Wrong parameters applied Check selected layer Review settings before starting the job

Tips for Better Results

1. Use descriptive project organization

Name files clearly before saving projects.

Examples:

  • Wood_Engrave_Cut
  • Metal_Color_Test

2. Keep engraving and cutting separated

Assign different operations to different layers rather than mixing them.

This improves workflow clarity.


3. Start with simple projects

Beginners should first test:

  • Text engraving
  • Basic cutting shapes

Complex designs can be introduced later.


4. Double-check material placement

Multiple operations rely on consistent positioning.

Even small movements can affect results.


5. Preview work before processing

Review layer assignments and processing order before starting.


Frequently Asked Questions

Q: How many LaserBurn multiple work layers can be used?

A: LaserBurn supports up to 10 layers, allowing up to 10 independent jobs in one project.


Q: How do I use LaserBurn multiple work layers for beginners?

A: Create or import objects, assign different layers using layer colors, and configure parameters separately for each layer.


Q: Can engraving and cutting happen in one project?

A: Yes. LaserBurn can engrave and cut sequentially during the same process.


Q: Can I assign different parameters to each layer?

A: Yes. Each layer supports separate processing settings.


Q: Can multiple layers be used for metal engraving?

A: Yes. Multiple layers can help create varying engraving effects on metal materials.


Q: Why are all my objects using the same settings?

A: Objects may have been assigned to the same layer accidentally.


Q: Is LaserBurn available for LONGER laser machines?

A: LaserBurn is designed specifically for compatible LONGER laser engravers.


Related Tutorials

For building a complete LONGER workflow, explore:


Final Thoughts

LaserBurn multiple work layers make project creation significantly easier by combining several operations into one workflow. Instead of separating engraving and cutting into individual runs, users can create a single project and allow Longer B1 to process everything automatically.

For beginners, mastering layer management is one of the fastest ways to improve workflow efficiency and reduce project setup time. Continue exploring LONGER guides and tutorials to build more advanced engraving skills. 

By products-tutorial | May 6, 2024
Design File, Calibration and Focus to LONGER Laser engraver

LONGER laser engravers are equipped with advanced technology that enables precise cutting using focused laser beams. This process is essential in both development and production phases. To achieve effective laser cutting, it's imperative to understand key principles, select suitable materials, design appropriately, operate the machine correctly, and adhere to safety protocols. The LaserB1 and Ray5 series are highly regarded for their exceptional performance in laser cutting. Operating a LONGER laser cutting machine involves a series of important steps:
 

Design File Preparation:


Theming relies on the accuracy and replicability of the design. Whether designing in software like Illustrator or CorelDRAW, vector formats like AI or DXF are crucial for preserving geometry and dimensions. Determine cutting speed and power levels, considering material details simultaneously.

 

  • Use compatible design software such as Adobe Illustrator, CorelDRAW, or Inkscape.
  • Save files in SVG or DXF formats.
  • Develop a comprehensive design concept from sketches or design software.
  • Maintain design style and line detail integrity.
  • Utilize laser processing for color or layer applications.
  • Organize layers or groups for easy navigation.
  • Ensure fonts are in vector format for versatility.
  • Follow technical documentation for dimensions and scale.
  • Avoid confusing file structures.
  • Double-check design files for accuracy before laser processing.


Machine Calibration and Focus

Machine calibration and focus are critical aspects of ensuring optimal performance from your LONGER laser cutting machine. Before beginning any cutting operation, it's essential to calibrate the machine properly. This involves adjusting the laser beam focus and aligning the mirrors according to the LONGER's guidelines or user manual instructions. Using a focus tool to determine the focal plane and adjusting the focal point based on material type, thickness, and processing goals can help optimize cutting performance.


In addition to calibration, beam alignment is another crucial step in the setup process. Properly directing the laser beam along the intended path is essential for achieving accurate cuts. Utilizing alignment tools provided by the LONGER’s and regularly inspecting and adjusting the laser beam alignment can help maintain cutting precision over time.


Furthermore, conducting test cuts or sample runs on scraps and test materials allows you to fine-tune the focus settings and ensure the quality of the cuts. By recording the best focus setting based on the results of these test cuts, you can streamline future cutting operations and minimize material waste.


Regular maintenance and monitoring are essential for preserving the performance and longevity of your LONGER laser cutting machine. Cleaning and inspecting optical components regularly, monitoring machine performance and consistency, and following manufacturer-recommended maintenance and calibration procedures are essential practices for ensuring continued cutting precision and efficiency.

By products-tutorial | April 26, 2024